
CoBrowser Public API is a set of endpoints that will allow you to start a chat using CoBrowser software from anywhere. Just by calling CoBrowser Public API endpoints from your software you will be able to start a chat from your mobile or desktop applications or from any other software you use such as your CRM, ERP, HelpDesk, etc.
This document will provide all technical information you require to start using CoBrowser Public API.
Attached to this document you could find also all technical endpoints documentation. See attached file 'ChatBotAPI.yaml'. You could use Swagger Editor to load that document and have all the technical documentation ready to be used in your software.
Endpoints Description
The CoBrowser Public API provides you four different types of endpoints: campaigns, chatsessions, xmppcredentials and xmppconnection. Each of one will allow you to interact with the system and manage that specific entity. We will describe all those types in the sections below.
In order to start using the CoBrowser Public API from your software you'll need three important parameters described below:
- API Token
- CoBrowser Public API URL
- HTTP-Bind URL, Websocket URL (depending on how you want to communicate with XMPP server) or XMPP domain and port for direct connection to our XMPP servers.
API Token
The API Token is a parameter provided by CoBrowser that identifies and authorizes you in the system and links you with your account.
You MUST provide this parameter when you call the CoBrowser Public API endpoints otherwise nothing will work.
You MUST provide this parameter as a custom HEADER in your requests to the CoBrowser Public API, as shown below:
X-API-TOKEN: 1pEgDtFA9xTWpSiWAWggTCQ39FWzuqwnuHjHD7cH
CoBrowser Public API URL
The CoBrowser Public API URL is the base URL you MUST use to call the endpoints from your software.
This is the base URL for the CoBrowser Public API:
https://app.cobrowser.com/api/app.php/chatbot/v1/
HTTP-Bind URL (DEPRECATED)
CoBrowser Public API uses ejabberd and XMPP protocol to perform communication between visitors and agents.
The HTTP-Bind URL is the URL you MUST use to communicate with CoBrowser ejabberd server and start the chat, send availability, send messages, update user status and close the chat.
This is the URL for HTTP-Bind ejabberd service:
https://app.cobrowser.com/http-bind
IMPORTANT NOTE: This communication mechanism has been marked as deprecated, please refer to WebSockets communication mechanism.
WebSocket URL
CoBrowser Public API uses ejabberd and XMPP (over Websockets) protocol to perform communication between visitors and agents.
The WebSocket URL is the URL you MUST use to communicate with CoBrowser ejabberd server and start the chat, send availability, send messages, update user status and close the chat.
This is the URL for WebSocket communication with ejabberd service:
wss://app.cobrowser.com/websocket
Direct connection to XMPP server
CoBrowser Public API uses ejabberd as XMPP server protocol to perform communication between visitors and agents.
You can connect directly to our XMPP servers in order to start the chat, send availability, send messages, update user status and close the chat.
This is the domain and port for direct communication with ejabberd service:
xmpp.app.cobrowser.com:5222
IMPORTANT NOTE: the previous way of connection app.cobrowser.com:5222 has been marked as deprecated and will be removed by January 31st 2023, using xmpp.app.cobrowser.com:5222 is now recommended.
Campaigns Endpoints
After describing the three main requirements you need to start using the CoBrowser Public API it's now time to start describing the three different endpoints you'll be able to use. Let's start with Campaigns endpoints.
These endpoints will allow you to interact with CoBrowser system and get information about Chat Campaigns in your account.
This is the first action you MUST do in order to know how many campaigns there're in your account and which of them are active or inactive.
NOTE: You can only start a chat session for active campaigns.
GET /campaigns
By calling this endpoint you'll get a list of all campaigns in your account.
This endpoint does not require any parameter.
Let's see a quick example:
https://app.cobrowser.com/api/app.php/chatbot/v1/campaigns
GET response:
       [
{
           "id":"Tm1dyqk5Nvq5TibLRSyJUkJX2kawLsHX",
           "name":"First Chat Campaign",
           "active":true
         },{
           "id":"UqJEeQ1w3VyhauoHuwsygIJrCaKzFRKCi",
           "name":"Second Chat Campaign",
           "active":false
         }
       ]
GET /campaigns/{id}
This endpoint will give you more details about a specified chat campaign. This should be called every time you need more information about a given campaign. This endpoint will give you not only details about specific campaign such us language or color configured in the campaign, will give you also information about availability of the campaign.
NOTE: you couldn't start a chat for a given campaign if it has no availability.
This endpoint needs a required parameter the ID of the campaign you'd like to get more information. That ID should be in the request path.
Let's see an example:
https://app.cobrowser.com/api/app.php/chatbot/v1/campaigns/Tm1dyqk5Nvq5TibLRSyJUkJX2kawLsHX
GET response:
{
    "id": "Tm1dyqk5Nvq5TibLRSyJUkJX2kawLsHX",
    "name": "First Chat campaign",
    "active": true,
    "color": "#0a6018",
    "language": "en",
    "availability": true,
    "available_agents": 1,
    "available_slots": 5,
    "cobrowsing": {
       "active": true,
       "cbr_text": "Screen sharing?",
       "cobrowsingButtonAcceptText": "Yes",
       "cobrowsingButtonDenyText": "No"
    },
    "survey": {
       "survey_question": "How would you rate our service?",
       "survey_options": [
          { "value": "good", "label": "Good" },
          { "value": "moderate", "label": "Might be better" },
          { "value": "bad", "label": "Bad" }
       ],
       "survey_comment_enable": true,
       "survey_comment": "Help us out to improve our service with your comments",
       "survey_thanks_enable": true,
       "survey_thanks": "Thanks for your time and comments",
       "active": true
    }
}
ChatSessions Endpoints
Once you know how many campaigns are active and with availability in your account you can start using the chat sessions endpoints to create a new chat session in the system. Let's see the available chat sessions endpoints.
These endpoints will allow you to create a new chatsession entity in the system and retrieve more information about an already created chatsession.
This entity MUST be present in the system in order to be able to generate the xmppconnection and be able to start the chat communication.
The chatsession entity holds information about when the chat was started, identifies the visitor and the agent to which the chat session was routed to.
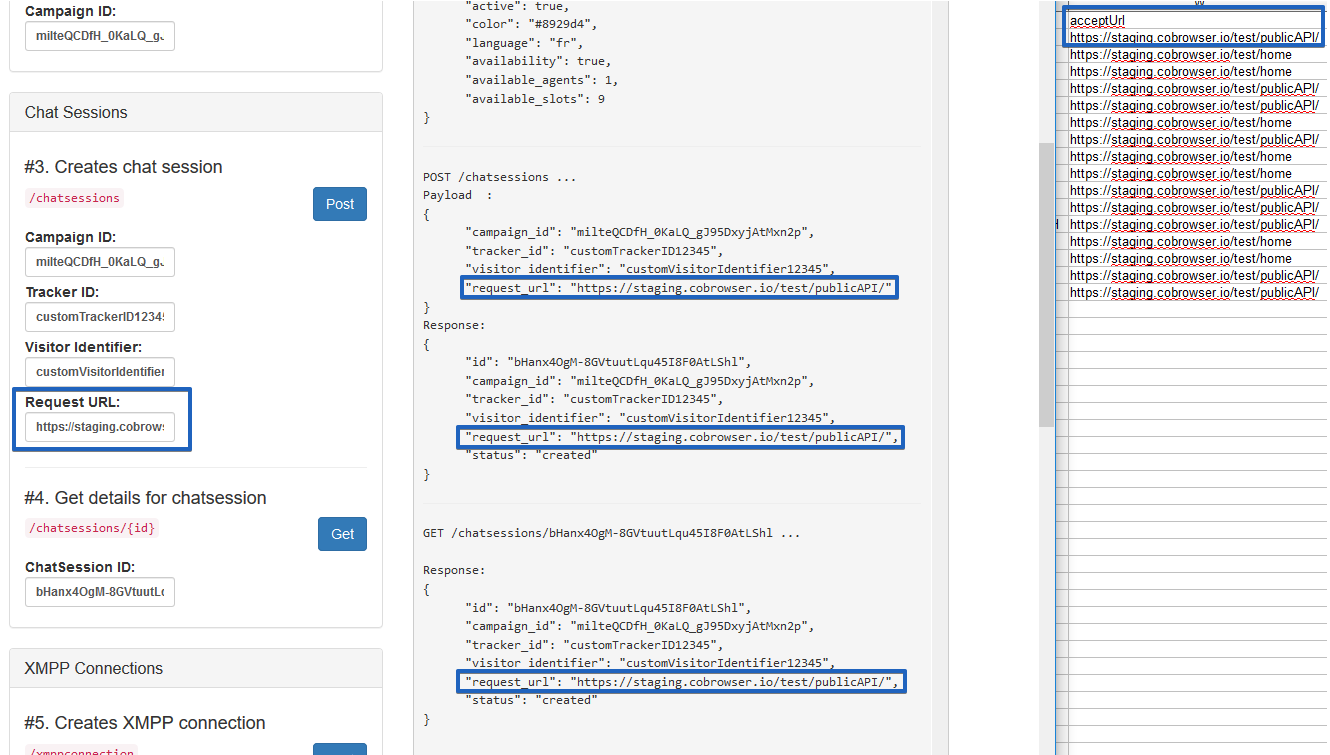
POST /chatsessions
When you perform a POST request to this endpoint you'll create a new chatsession entity in the system.
This endpoint requires some parameters to be sent in the request body:
- campaign_id: (required) the campaign id for which you'd like to start a chat.
- tracker_id: (optional) this is the internal visitor unique identifier you can provide to track information about the visitor in your website or software.
- visitor_identifier: (optional) this is the displayable identifier for the current chatter you can provide and will be shown in agent interface chat widget.
- request_url: (optional) this is the URL where the chat will start.
Below you'll find an example:
https://app.cobrowser.com/api/app.php/chatbot/v1/chatsessions
POST body request:
       {
         "campaign_id": "Tm1dyqk5Nvq5TibLRSyJUkJX2kawLsHX",
         "tracker_id": "9082734890274",
         "visitor_identifier": "customer_id@customers-portal.com"
         "request_url": "https://www.customers-portal.com"
       }
POST response:
       {
         "id": "u2Ya9LtnN15EOx9tFheIcqw6a5CHkSMY",
         "campaign_id": "Tm1dyqk5Nvq5TibLRSyJUkJX2kawLsHX",
         "tracker_id": "9082734890274",
         "visitor_identifier": "customer_id@customers-portal.com"
         "request_url": "https://www.customers-portal.com"
         "status": "created"
       }
GET /chatsessions/{id}
This endpoint will give you more information about a specific chatsession entity.
This endpoint needs a required parameter the ID of the chatsession you'd like to get more information. That ID should be in the request path.
Let's see an example:
https://app.cobrowser.com/api/app.php/chatbot/v1/chatsessions/u2Ya9LtnN15EOx9tFheIcqw6a5CHkSMY
GET response:
       {
         "id": "u2Ya9LtnN15EOx9tFheIcqw6a5CHkSMY",
         "campaign_id": "Tm1dyqk5Nvq5TibLRSyJUkJX2kawLsHX",
         "tracker_id": "9082734890274",
         "visitor_identifier": "customer_id@customers-portal.com"
         "request_url": "https://www.customers-portal.com"
         "status": "active"
       }
XMPPCredentials Endpoints
The XMPPCredentials endpoints are the endpoints you must use if you're planning to communicate with out ejabberd servers using direct connection using xmpp.app.cobrowser.com and port 5222 or using WebSockets.
These endpoints will provide you the credentials of the chat session so you can communicate with agents using ejabberd through port 5222 or WebSockets.
In order to do so we will provide you two new endpoints for these credentials.
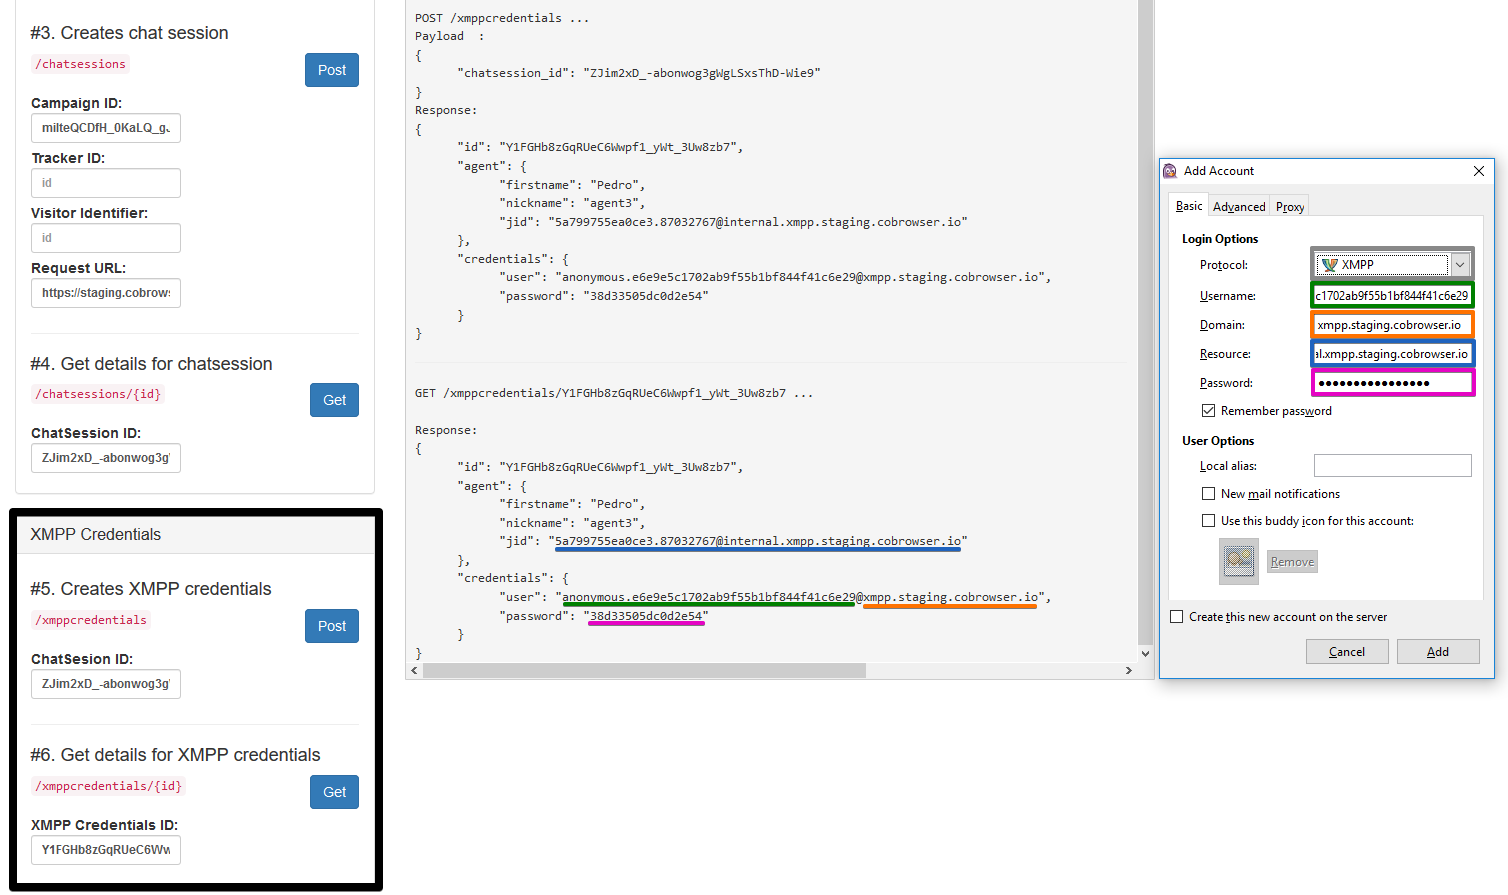
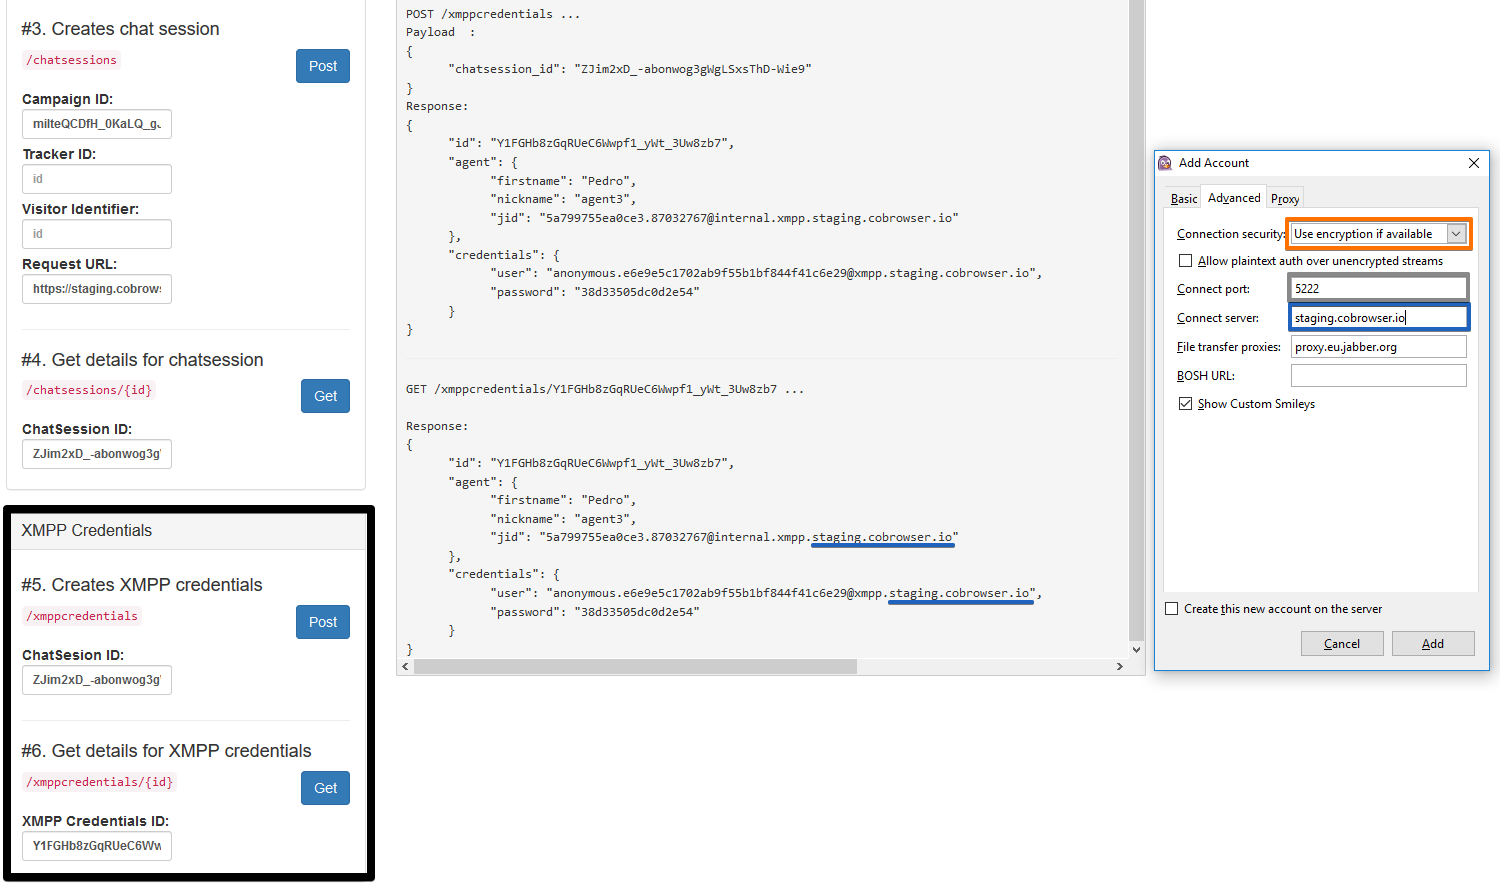
POST /xmppcredentials
When you perform a POST request to this endpoint you'll create a new xmppcredentials entity for the given chat session in the system.
This endpoint requires some parameters to be sent in the request body:
- chatsession_id: (required) the chatsession id for which you'd like to create the xmppcredentials entity and use them for ejabberd server communication.
Below you'll find an example:
https://app.cobrowser.com/api/app.php/chatbot/v1/xmppcredentials
POST body request:
       {
         "chatsession_id": "u2Ya9LtnN15EOx9tFheIcqw6a5CHkSMY"
       }
POST response:
{
  "id": "__ckvyUblnUWSxIQ0qmjgM41xclB9ELO8uZ_K0-Hn0iilI1SQYdSRijQ",
  "agent": {
    "firstname": "James",
    "nickname": "agent1",
    "jid": "58b92dcec1bab6.36437731@internal.xmpp.app.cobrowser.com"
  },
  "credentials": {
    "user": "anonymous.470d241f427cf5f8e2234ab750b08@xmpp.app.cobrowser.com",
    "password": "2d28afe9e39e8b65969991234d9adc496c82cde2390277c822a2b2f",
    "domain": "xmpp.app.cobrowser.com",
    "resource": "671b3e643bcc9a7"
  }
}
In the request response you'll find all the arguments that you've seen above:
- id: this will be the ID of the newly created xmppcredentials entity.
- agent: will provide you the jid, first name and nick name of the agent assigned to your chat session.
- jid: This is the unique XMPP address to identify the agent.
- firstname: This is the agent's first name. You could use it to provide more information about the agent to the visitor.
- nickname: This is usually the agent's nick name you'll see as visitor during the conversation.
- credentials: this object represents the user and password you MUST use to establish communication with ejabberd server and be able to start chatting.
- user: the unique XMPP address to identify the visitor.
- password: password needed to connect to ejabberd server as visitor.
- domain: XMPP domain used for WebSockets communication.
- resource: XMPP resource identifier.
NOTE: for WebSocket communication you need to use user + resourcer to generate the JID, the password, domain and resource. For direct connection using port 5222 you only need user and password.
GET /xmppcredentials/{id}
This endpoint will give you more information about a specific xmppcredentials entity.
This endpoint needs a required parameter the ID of the xmppcredentials you'd like to get more information. That ID should be in the request path.
Let's see an example:
https://app.cobrowser.com/api/app.php/chatbot/v1/xmppcredentials/__ckvyUblnUWSxIQ0qmjgM41xclB9ELO8uZ_K0-Hn0iilI1SQYdSRijQ
GET response:
{
  "id": "__ckvyUblnUWSxIQ0qmjgM41xclB9ELO8uZ_K0-Hn0iilI1SQYdSRijQ",
  "agent": {
    "firstname": "James",
    "nickname": "agent1",
    "jid": "58b92dcec1bab6.36437731@internal.xmpp.app.cobrowser.com"
  },
  "credentials": {
    "user": "anonymous.470d241f427cf5f8e21176616d750b08@xmpp.app.cobrowser.com",
    "password": "2d28afe9e39e8b6596999c05f9d9adc496c82cde2390277c822a2b2f",
    "domain": "xmpp.app.cobrowser.com",
    "resource": "671b3e643bcc9a7"
  }
}
XMPPConnections Endpoints
Once you have requested information about specific chat campaign, you've seen that campaign is active and it has availability and you have created a the chat session for that campaign, then is the moment to create the xmppconnection entity in the system.
The xmppconnection entity will hold information about authorization between the visitor that wants to start the chat, the agent assigned to the chat session and ejabberd server.
Without this information you won't be able to start the chat communication using mod_bosh (http-bind) between the two parts, the agent and the visitor.
IMPORTANT NOTE: XMPPConnection endpoints must be used only for mod_bosh (http-bind) communication. If you're planning to use direct connection to ejabberd through port 5222 or WebSockets you do not need to create the xmppconnection entity.
In this section we will describe two different endpoints you can use to create a xmppconnection entity in the system and to get detailed information about an already created xmppconnection entity.
POST /xmppconnection
When you perform a POST call to this endpoint you'll create a new xmppconnection entity in the system.
This endpoint requires some parameters to be sent in the request body:
- chatsession_id: (required) the chatsession id for which you'd like to create the xmppconnection entity and get credentials for ejabberd service.
Below you'll find an example:
https://app.cobrowser.com/api/app.php/chatbot/v1/xmppconnection
POST body request:
       {
         "chatsession_id": "u2Ya9LtnN15EOx9tFheIcqw6a5CHkSMY"
       }
POST response:
       {
         "id": "FcdgNNgbimrThmDysBsjgr_k5FElYJQC",
         "agent": {
           "jid": "agent1_exmple.com_58d0ea92b1798@xmpp.app.cobrowser.com",
           "firstname":"James",
           "nickname":"agent1"
         },
         "credentials":{
           "jid":"anonymous.1c1e88b465c962f3f3cee@localhost/671b3e6430b6bcc9a7",
           "rid":9114780464,
           "sid":"6e1dce1fdb655a390060f321d5b5643204d418a8",
           "bosh":{
             "wait":"60",
             "requests":"2",
             "ver":"1.8",
             "polling":"2",
             "inactivity":"30",
             "hold":"",
             "to":"",
             "ack":null,
             "accept":"",
             "maxpause":"120"
           }
         }
}
In the request response you'll find all the arguments that you've seen above:
- id: this will be the ID of the newly created xmppconnection entity.
- agent: will provide you the jid, first name and nick name of the agent assigned to your chat session.
- jid: This is the unique XMPP address to identify the agent.
- firstname: This is the agent's first name. You could use it to provide more information about the agent to the visitor.
- nickname: This is usually the agent's nick name you'll see as visitor during the conversation.
- credentials: this object represents the ejabberd credentials you MUST use to establish communication with ejabberd server and be able to start chatting.
- jid: the unique XMPP address to identify the visitor.
- rid: sequential number to order and verify communications.
- sid: the unique XMPP identifier of the session created with ejabberd.
- bosh: the BOSH (Bidirectional-streams Over Synchronous HTTP) configuration object used by the XMPP session.
- ack: If client is using or not acknowledgments (1 or 0)
- hold: Maximum number of request manager is allowed to keep waiting at one time during a session.
- inactivity: Maximum period manager can stay if client's request is not replied.
- maxpause: Maximum time session can be paused.
- polling: The shortest allowable polling interval in seconds.
- requests: Maximum number of multiple requests on same time.
- ver: The highest version of BOSH protocol supported.
- wait: The longest time the manager will wait before responding to any request during the session.
With all this provided information you'll be able to start a new ejabberd communication using XMPP and be able to send/receive messages, user statuses and end the chat.
We'll describe XMPP-ejabberd communication in the next section.
GET /xmppconnection/{id}
This endpoint will give you more information about a specific xmppconnection entity.
This endpoint needs a required parameter the ID of the xmppconnection you'd like to get more information. That ID should be in the request path.
Let's see an example:
https://app.cobrowser.com/api/app.php/chatbot/v1/xmppconnection/FcdgNNgbimrThmDysBsjgr_k5FElYJQC
GET response:
     {
         "id": "FcdgNNgbimrThmDysBsjgr_k5FElYJQC",
         "agent": {
           "jid": "agent1_exmple.com_58d0ea92b1798@xmpp.app.cobrowser.com",
           "firstname":"James",
           "nickname":"agent1"
         },
         "credentials":{
           "jid":"anonymous.1c1e88b465c962f3f3cee@localhost/671b3e6430b6bcc9a7",
           "rid":9114780464,
           "sid":"6e1dce1fdb655a390060f321d5b5643204d418a8",
           "bosh":{
             "wait":"60",
             "requests":"2",
             "ver":"1.8",
             "polling":"2",
             "inactivity":"30",
             "hold":"",
             "to":"",
             "ack":null,
             "accept":"",
             "maxpause":"120"
           }
         }
}
ejabberd XMPP communication
After all the steps described before have been done, it's time to start using the CoBrowser Public API HTTP-Bind endpoint or WebSockets to communicate with ejabberd.
This will allow you to make the new chat appears in the agent interface and start sending/receiving messages between agent and your visitor.
In this section and to guide you through the examples we'll use a JavaScript sample client using JsJac library to handle XMPP ejabberd communication.
As we mentioned at the beginning of this documentation you can choose between two different communication mechanism using mod_bosh (http-bind) or WebSockets. Below we will describe both methods.
You will discover that the communication mechanism is exactly the same for both methods http-bind or websockets, just passing different arguments and using different JsJaC instances but the setup for the connection is identical.
IMPORTANT NOTE: http-bind communication mechanism has been marked as deprecated and using WebSockets it's now recommended.
Setup connection and connect with ejabberd (via websockets)
Now we will show you how to communicate with ejabberd but using WebSockets.
Once you have all the credentials from the POST /xmppcredentials endpoint it's time to start configuring your connection and connect with ejabberd.
//
// create connection object, enable debugger (optional)
//
var oDbg = new JSJaCConsoleLogger(4);

self.connection = new JSJaCWebSocketConnection({
  oDbg: oDbg,
  httpbase: 'wss://app.cobrowser.com/websocket';
});

//
// setup connection, register handlers....
//

// handler for chat messages received from agent
connection.registerHandler( 'message_in' , handleMessageIn );
// handler for chat messages sent to agent
connection.registerHandler( 'message_out' , handleMessageOut );

// handler for presence stanza
connection.registerHandler( 'presence_in' , handlePresenceIn );
connection.registerHandler( 'presence_out' , handlePresenceOut );

// handler for IQ stanza
connection.registerHandler( 'iq' , handleIQ );

// handler for onconnect event
connection.registerHandler( 'onconnect' , handleConnected );
// handler for onerror event
connection.registerHandler( 'onerror' , handleError );
// handler for on status changed event
connection.registerHandler( 'status_changed' , handleStatusChanged );
// handler for ondisconnect event
connection.registerHandler( 'ondisconnect' , handleDisconnected );

// handler for IQ Ping stanza
connection.registerIQGet( 'ping', NS_PING , handleIqPing );

//
// pass the connection variables and connect
//
var
  oArgs = {
    domain : oOptions.domain,
    username : oOptions.jid,
    resource : oOptions.resource,
    pass : oOptions.password
  };

self.connection.connect( oArgs );
Setup connection and connect with ejabberd (via mod_bosh Http-Bind)
Once you have all the credentials from the POST /xmppconnection endpoint it's time to start configuring your connection and connect with ejabberd service.
  var
    args = {
     jid : credentials.jid,
       sid : credentials.sid,
     rid : parseInt(credentials.rid, 10) - 1,
      polling : credentials.bosh.polling,
       inactivity : credentials.bosh.inactivity,
     requests : credentials.bosh.requests,
      wait : credentials.bosh.wait
    },
    connection = new JSJaCHttpBindingConnection({
// you can enable logging passing a JSJaCConsoleLogger(4) object
      oDbg : false,
      httpbase : "https://app.cobrowser.com/http-bind"
    });

  // Now it's time to setup the connection

    // handler for chat messages received from agent
    connection.registerHandler( 'message_in' , handleMessageIn );
    // handler for chat messages sent to agent
    connection.registerHandler( 'message_out' , handleMessageOut );

    // handler for presence stanza
    connection.registerHandler( 'presence_in' , handlePresenceIn );
    connection.registerHandler( 'presence_out' , handlePresenceOut );

    // handler for IQ stanza
    connection.registerHandler( 'iq' , handleIQ );

    // handler for onconnect event
    connection.registerHandler( 'onconnect' , handleConnected );
    // handler for onerror event
    connection.registerHandler( 'onerror' , handleError );
    // handler for on status changed event
    connection.registerHandler( 'status_changed' , handleStatusChanged );
    // handler for ondisconnect event
    connection.registerHandler( 'ondisconnect' , handleDisconnected );

    // handler for IQ Ping stanza
    connection.registerIQGet( 'ping', NS_PING , handleIqPing );

  connection.inherit( args );
NOTE: As you could noticed there are slightly differences on the way to connect to ejabberd server depending on the communication mechanism you use. Just use different JsJaC instances ( JSJaCHttpBindingConnection or JSJaCWebSocketConnection ) and pass different arguments.
Connection established
Right after the connection is configured and done, the handleConnected handler will be called and that's the moment you MUST send your presences as a visitor.
  var
    presence = new JSJaCPresence();

  // first presence from visitor to itself just to inform XMPP we're online.
  presence.setFrom( visitorJid );
  connection.send( presence );

  // subscribe presence from visitor to agent to reach CoBrowser component.
  presence = new JSJaCPresence();
  presence.setFrom( visitorJid );
  presence.setTo ( agentJid );
  presence.setType( 'subscribe' );
  connection.send( presence );

  // available presence from visitor to inform I'm available for chatting.
  presence = new JSJaCPresence();
  presence.setFrom ( visitorJid );
  presence.setTo ( agentJid );
  presence.setStatus( 'available' );
  presence.setShow ( 'chat' );
  connection.send( presence );
By sending those presence stanzas you're informing the system that you as visitor are online and would like to start a chat, and the chat will appear in agent screen.
Those presences stanzas MUST be sent, otherwise the chat won't start and won't appear correctly in agent screen.
Handling Presences
During connection setup you defined different handlers for the different events we can interact with in XMPP world. One of them was handlePresenceIn, this handler will allow you to listen all the presence stanzas coming from agent and respond accordingly.
You MUST listen to different agent presence stanzas to properly handle your conversation.
At the moment you stablish the connection and communication you'll receive a presence stanza 'subscribe'. It's very important to respond to this stanza with another presence stanza 'subscribed' and state 'active', this way you'll informing ejabberd service you're subscribed to the agent and ready to start the conversation, as you can see below:
handlePresenceIn = function ( oJSJaCPacket ) { var
obj = {
to : oJSJaCPacket.getToJID(),
from : oJSJaCPacket.getFromJID(),
type : oJSJaCPacket.getType()
};
if ( obj.from !== obj.to && obj.type && obj.type === 'subscribe') { // we'll inform XMPP now we're now subscribed
var
presence = new JSJaCPresence();
presence.setFrom( visitorJid );
presence.setTo ( agentJid );
presence.setType( 'subscribed' );
connection.send( presence );
// we'll send now state 'active', ready for chat.
var
oMsg = new JSJaCMessage();
oMsg.setTo( agentJid );
oMsg.appendNode(
oMsg.buildNode(
'active',
{xmlns: 'http://jabber.org/protocol/chatstates'}
));
connection.send( oMsg );
}
}
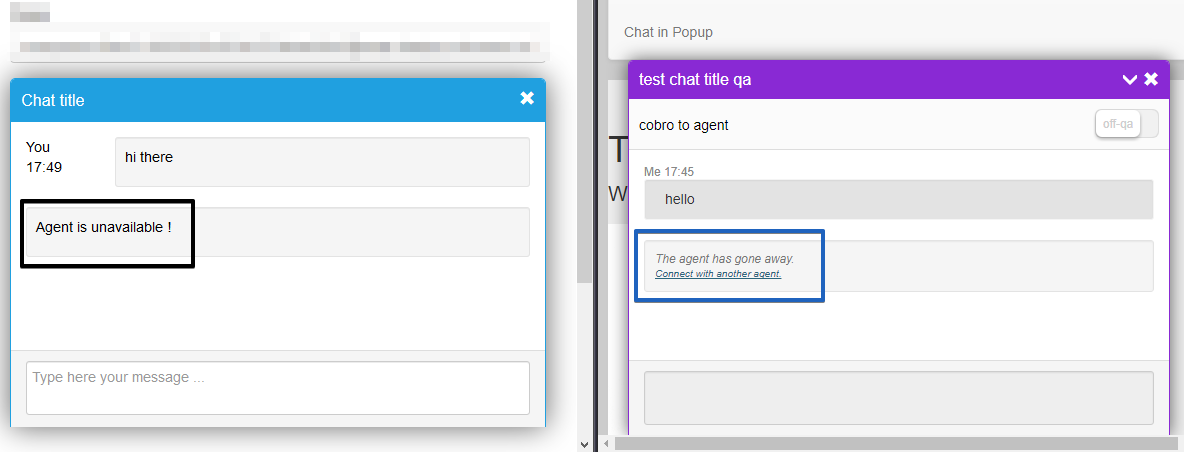
The example you've seen is not the only kind of presence stanzas you MUST listen to. There're other two very important presence stanzas you MUST handle, 'unavailable' and 'available'.
These two presence stanzas are informing you that the agent is unavailable or available respectively. So, on receiving 'unavailable' presence stanzas you could display some message informing your visitor that the agent is 'unavailable' in that moment and he won't be able to receive or respond to your messages.
In the other hand, when you receive 'available' presence stanza you could display a message to your visitor informing him or her that the agent is online again and will be able to receive messages.
handlePresenceIn = function ( oJSJaCPacket ) { var
obj = {
to : oJSJaCPacket.getToJID(),
from : oJSJaCPacket.getFromJID(),
type : oJSJaCPacket.getType(),
show : oJSJaCPacket.getShow(),
attr_status : oJSJaCPacket.getNode().getAttribute('status')
};
if ( obj.from !== obj.to && obj.type && obj.type === 'unavailable') { // let's display some info about agent is unavailable, connection issues
// or he/she just closed his/her session without
displayCustomMsg( 'Agent is unavailable ! ' );
}
if ( obj.from !== obj.to && obj.attr_status && obj.attr_status === 'available') {
displayCustomMsg( 'Agent is available again ! ' );
}
}
Handling messages
In every conversation you MUST handle messages in/out. In message will be the messages received from agent. Out messages will be the messages you, as visitor, send to the agent.
Out Messages
When you want to send a message to the agent you could use a code like this: try {
var
oMsg = new JSJaCMessage();
oMsg.setFrom( visitorJid );
oMsg.setTo ( agentJid );
oMsg.setBody( 'This is a message to the agent' );
oMsg.setType('chat');
connection.send(oMsg);
} catch ( error ) {
// handle here the error.
}
It's important to mention that you can also send 'composing' state. This state will inform agent that visitor is typing some text. This information will be displayed in Agent screen chat conversation.
If you want to send this 'composing' state to the agent you should use a code like this: // send state 'composing'
var
oMsg = new JSJaCMessage();
oMsg.setTo( agentJid );
oMsg.appendNode(
oMsg.buildNode(
'composing',
{xmlns: 'http://jabber.org/protocol/chatstates'}
));
connection.send( oMsg );
In Message
During the conversation you could receive different type of messages through the handler 'handleMessageIn' handler you specified during connection setup. Below we describe the different types of chat messages you'll receive:
- Regular chat message. These are the regular chat messages you'll receive, they're the conversation itself.
A regular chat message looks like this:<message xmlns="jabber:client"
from="bc1234@jaxlecho.localhost"
to="anonymous.64be335b901133024ca85c437138128f@localhost"
uid="abab238a-67cc-4ee2-934b-1d0f3cc0e678"
type="chat"
agent_id="ICdmJjkdFc/hiYoSoZKq1fZaokdZpCSfx64zDXNNWpw=">
<body>hello</body>
<active xmlns="http://jabber.org/protocol/chatstates"/>
<nick xmlns="http://jabber.org/protocol/nick">agent3</nick>
</message> - Composing message. You'll receive a composing message when agent is typing.
A composing message looks like this XML code:<message xmlns="jabber:client"
from="bc1234@jaxlecho.localhost"
to="anonymous.64be335b901133024ca85c437138128f@localhost"
uid="77fd5a5e-0559-4c4e-81bb-84fc66d965eb" type="chat">
<composing xmlns="http://jabber.org/protocol/chatstates"/>
<nick xmlns="http://jabber.org/protocol/nick">agent3</nick>
</message> - Closed message. Is the kind of message you'll receive when the agent closes the chat conversation.
This is an example of a closed chat message:<message xmlns="jabber:client"
from="bc1234@jaxlecho.localhost"
to="anonymous.64be335b901133024ca85c437138128f@localhost"
uid="16a05507-8827-42bd-83c5-d7d632f384e3"
type="chat">
<closed xmlns="http://jabber.org/protocol/chatstates"/>
<nick xmlns="http://jabber.org/protocol/nick">agent3</nick>
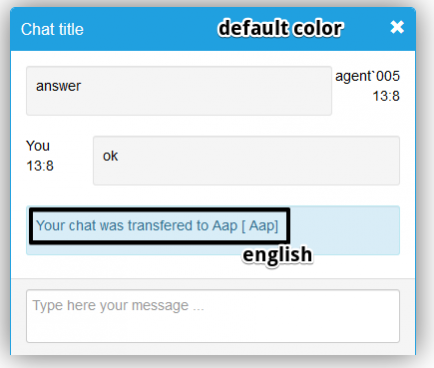
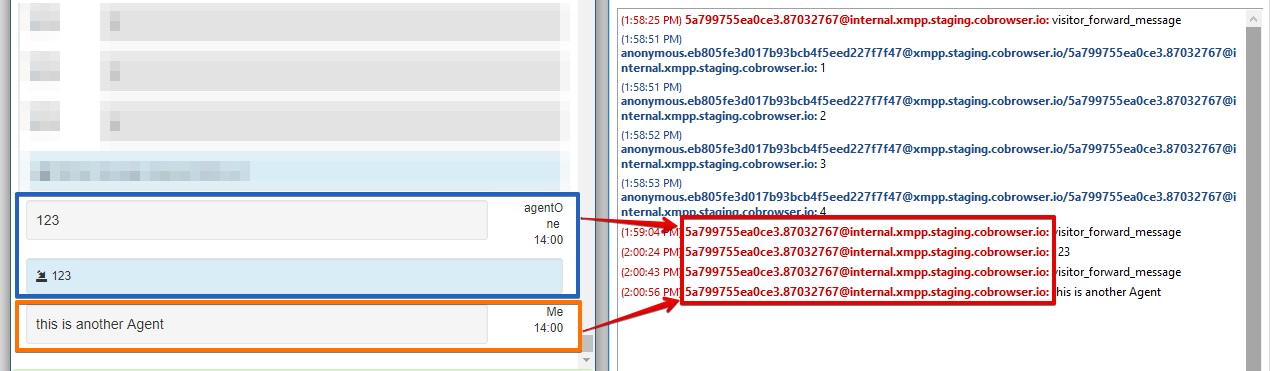
</message> - Transfered message. Transfered kind of messages will be received if your conversation is transfered to another agent. In this case you'll receive more attributes giving you information about the new agent who is going to handle your conversation from now on.
Example of a transfered chat message:<message xmlns="jabber:client"
from="bc1234@jaxlecho.localhost"
to="anonymous.64be335b901133024ca85c437138128f@localhost"
uid="52a42448-431c-4394-b661-1fd343f4bb22"
type="chat">
<body>visitor_forward_message</body>
<nick xmlns="http://jabber.org/protocol/nick">agent3</nick>
<internal xmlns="http://cobrowser.io/protocol/chatsession#forward">
<chat_forwarding>visitor_forward_message</chat_forwarding>
<agent>
<nickname>agent3</nickname>
<firstname>Pedro</firstname>
</agent>
</internal>
</message> - Blocked message.
Agents have the possibility to block a visitor if the visitor does not behave properly or it's using offensive language. This blocked message is sent to visitor to inform him/her that was blocked by agent.
Below you can see an example of the blocked message XML:<message xmlns="jabber:client"
from="bc1234@jaxlecho.localhost"
to="anonymous.4d85b4bd35f895aeae9ceee0e98cee9e@localhost"
uid="05e4e8a9-7944-4b0a-8383-7af71254b6fc"
type="chat">
<blocked xmlns="http://jabber.org/protocol/chatstates"/>
<nick xmlns="http://jabber.org/protocol/nick">agent1</nick>
</message>m
You can listen to those different types of messages and handle them accordingly in your handler.
  handleMessageIn = function ( oJSJaCPacket ) {
    var
      composing = oJSJaCPacket.getChild('composing'),
      closed    = oJSJaCPacket.getChild('closed'),
       internal  = oJSJaCPacket.getChild('internal'),
       blocked   = oJSJaCPacket.getChild('blocked');

    if ( blocked ) {
      // handle blocked
    }

    if ( closed ) {
      // handle closed
      // remember that in this case you MUST send state 'closed'
      // and disconnect
    }

    if ( composing ) {
      // handle composing
    }

    if ( internal ) {
      // handling internal messages, in this particular case, transfered message
      var
        agent      = internal.lastChild,
        agent_nick = agent.firstChild.textContent,
        agent_name = agent.lastChild.textContent;

      displayCustomMsg('Your chat was transfered to ' + agent_name);
    }
  }
Internal messages - this is special messages, which we send to our system to track some events (e.g chat was closed by visitor - we use internal event ``
Disconnection
You as visitor can end the chat. Agents also can end the chat. No matters who make this before, in both cases you as visitor MUST send always the state 'closed' in order to finish properly the chat session and perform a connection disconnect to end communication properly with ejabberd server.
If you as visitor decides to close and finish the chat then you MUST do these actions: // send state closed
var
oMsg = new JSJaCMessage();
oMsg.setTo( agentJid );
oMsg.appendNode(
oMsg.buildNode( 'closed', {xmlns: 'http://jabber.org/protocol/chatstates'} )
);
connection.send( oMsg );
// after 'closed' state is sent you can disconnect from ejabberd service.
connection.disconnect();
If it's the agent who first ends the chat, then you as visitor in your handleMessageIn handler will receive a 'closed' message, then you can response with state 'closed' and disconnects from ejabberd service as show in example below:
  handleMessageIn = function (
    var
      closed = oJSJaCPacket.getChild('closed');
    if ( closed ) {
        // send state closed
        var
          oMsg = new JSJaCMessage();

        oMsg.setTo( agentJid );
        oMsg.appendNode(
        oMsg.buildNode(
          'closed',
          {xmlns: 'http://jabber.org/protocol/chatstates'}
        ));

        connection.send( oMsg );

        // after 'closed' state is sent you can disconnect from ejabberd service.
        connection.disconnect();
    }
};
It's really important to send the `closed` state in both cases otherwise the reporting information about the chat session will never be properly generated.
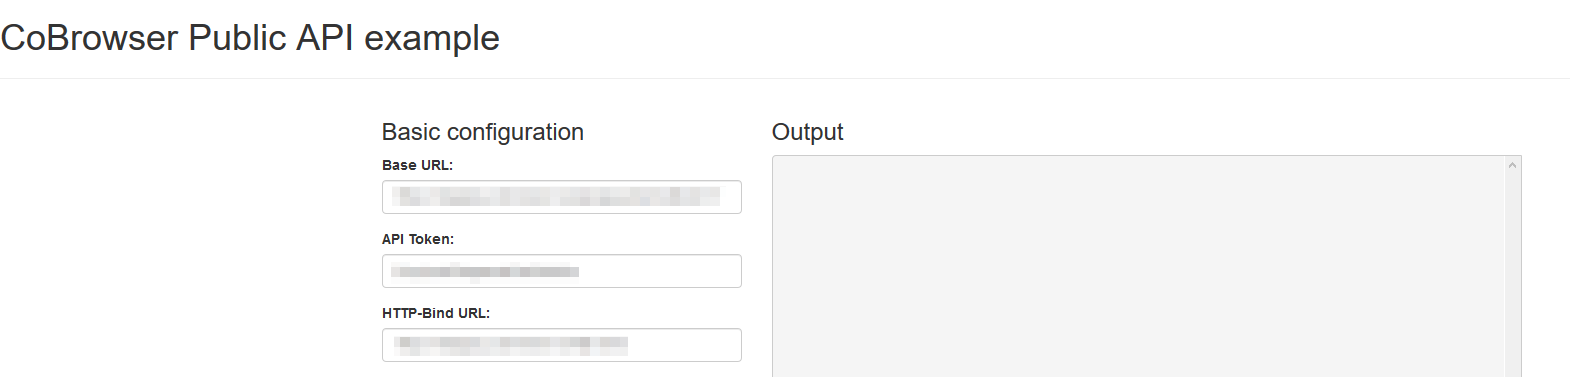
Public API Demo test site
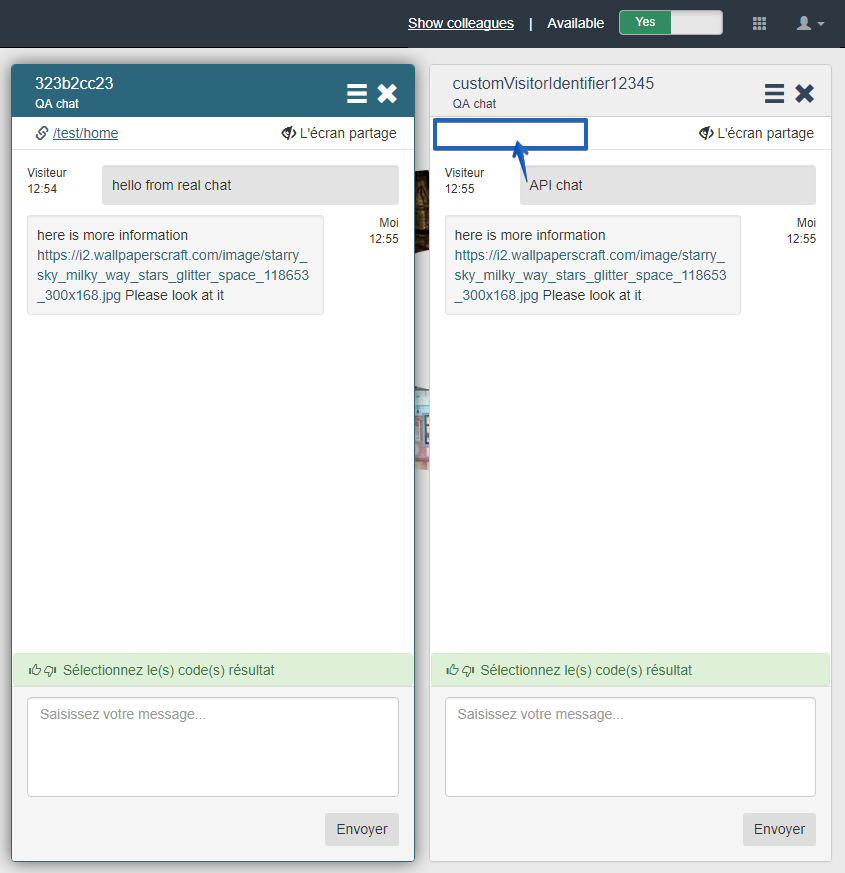
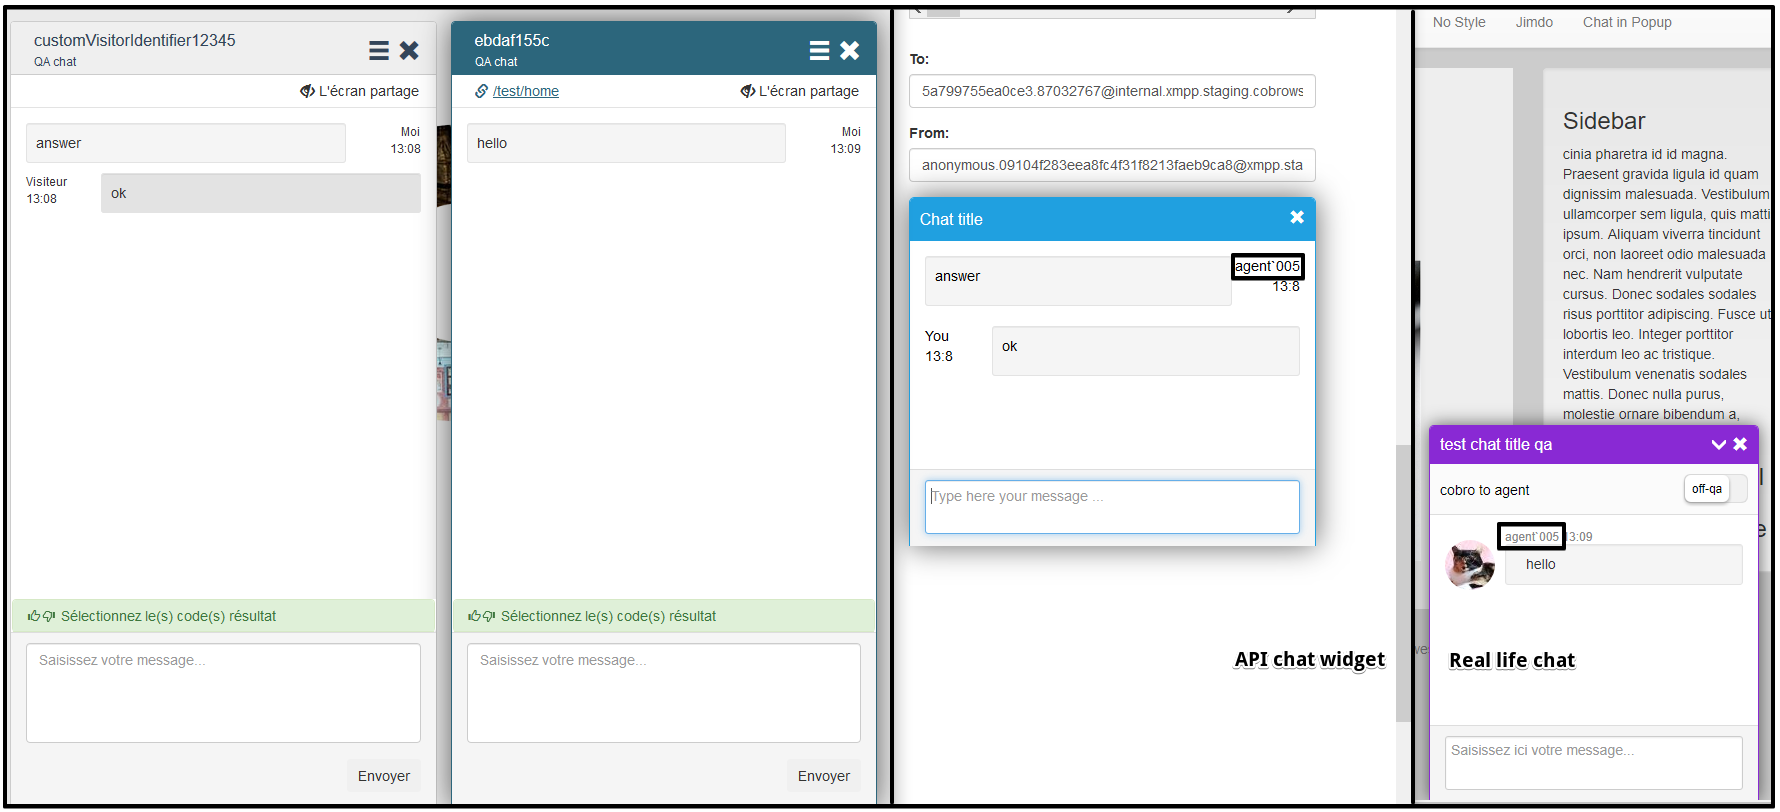
On CoBrowser test environments you could find in the demo test site a Public API test site.
This Public API test site gives you the oportunity to have a chat similar to regular chats on the website and to track a lot of extra information, which helps to make some work easier for the User.
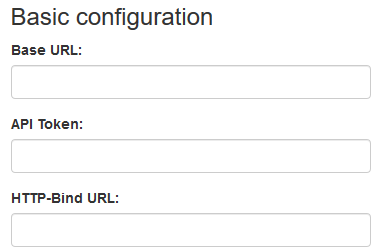
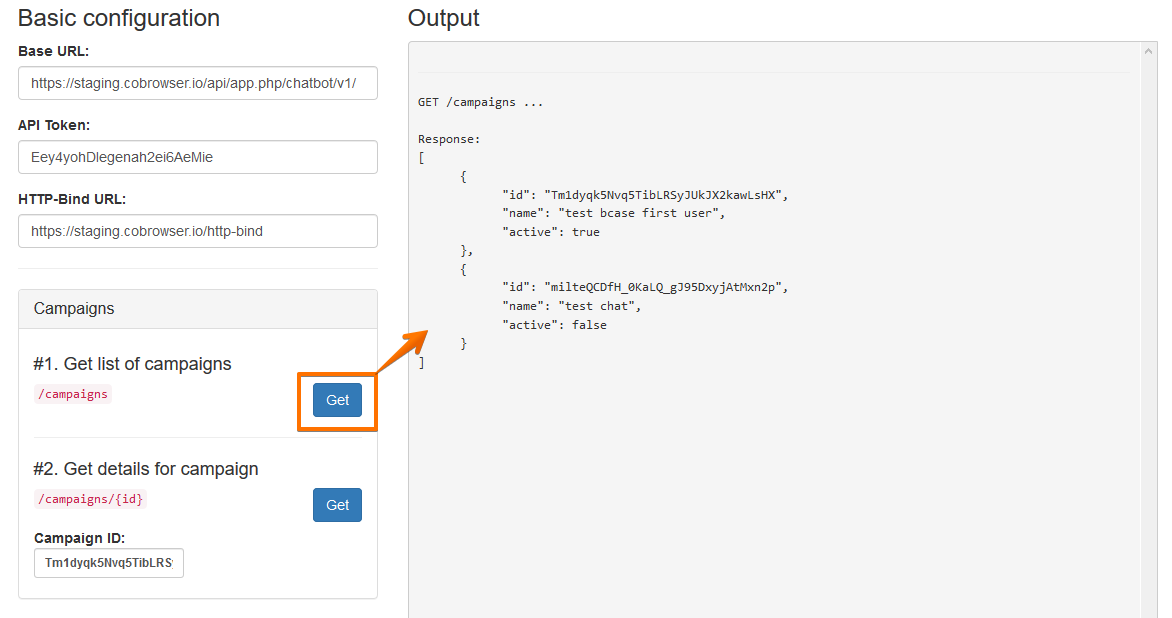
In order to start a chat and get some data, User should input next information: Base URL, API Token, HTTP-Bind URL into Basic configuration.
Base URL: will be the base URL used to call the public API
API Token: will be the token that you MUST use to be able to access the public API. It provides security but also it links with the correct account. It is a unique identifier of an application requesting access to a service.
HTTP-Bind URL: is the URL of our ejabberd communication server used for chat.
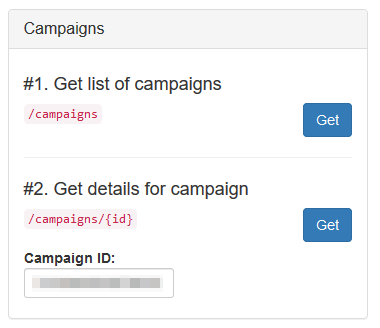
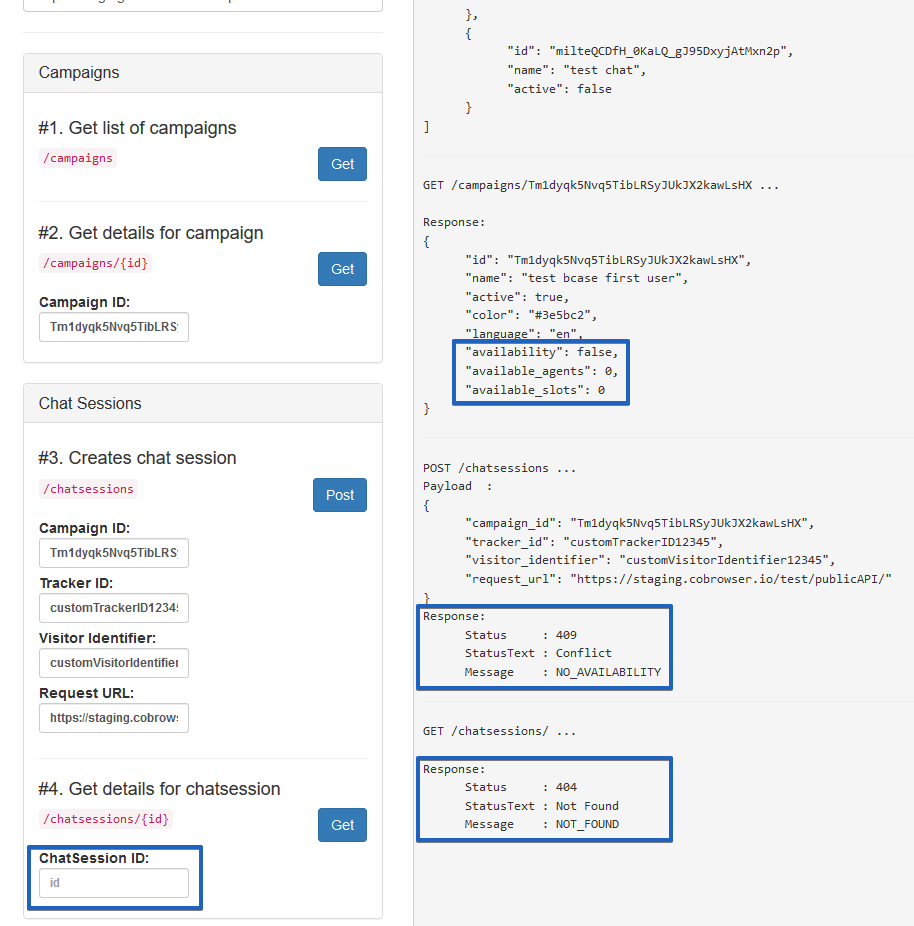
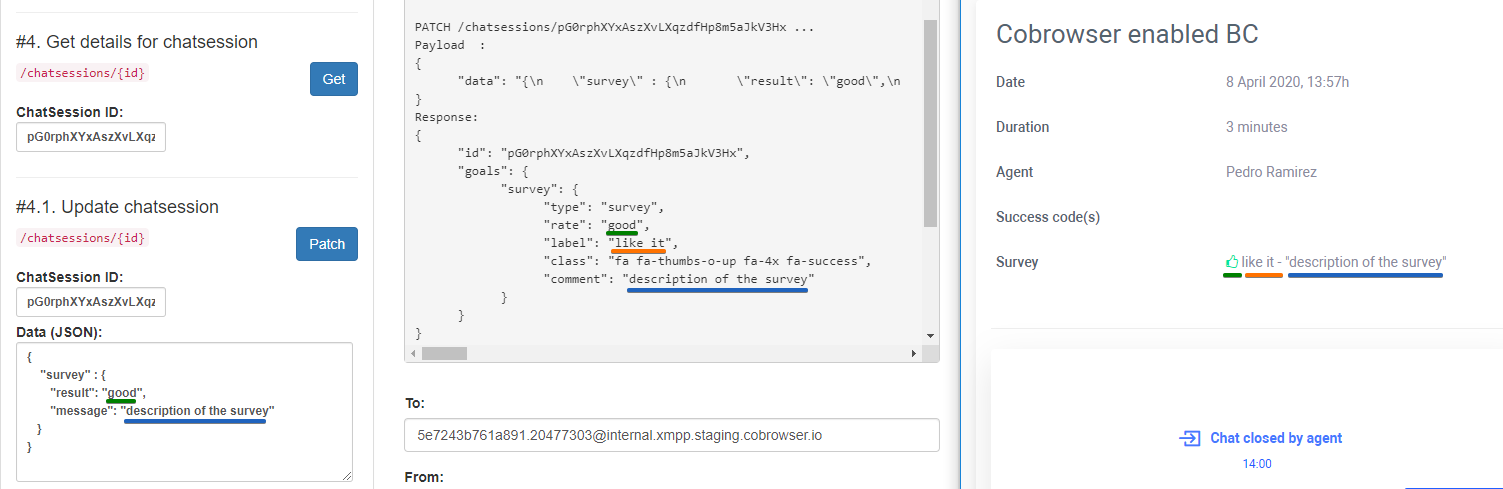
"Campaigns" block allows to get general information about all related to the account chat campaigns and some details for every campaign requested by "Campaign ID".
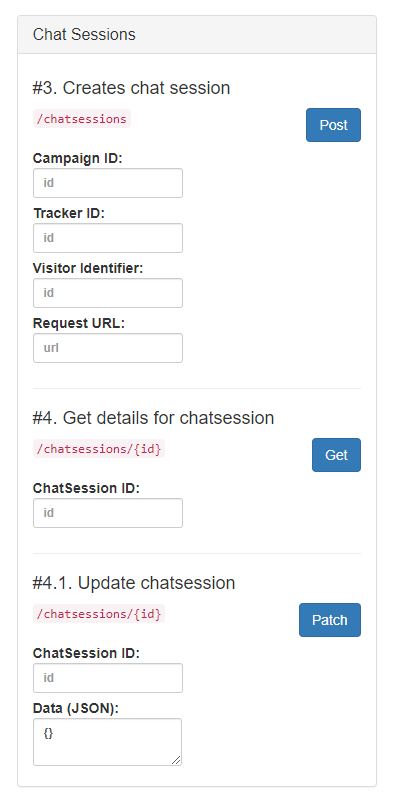
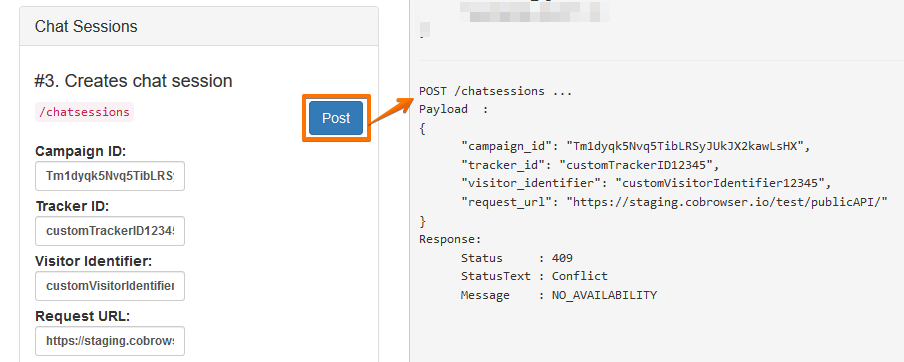
"Chat Sessions" block allows to create (POST) new chat sessions (chats) and get some detailed information about them. Chat session can be created for the specific selected campaign. User can get more information about created chat session using ChatSession ID.
Every time you use one of the endpoints in this test site, you'll see the request information you're sending and also the response coming back from the server in the "Output" log window.
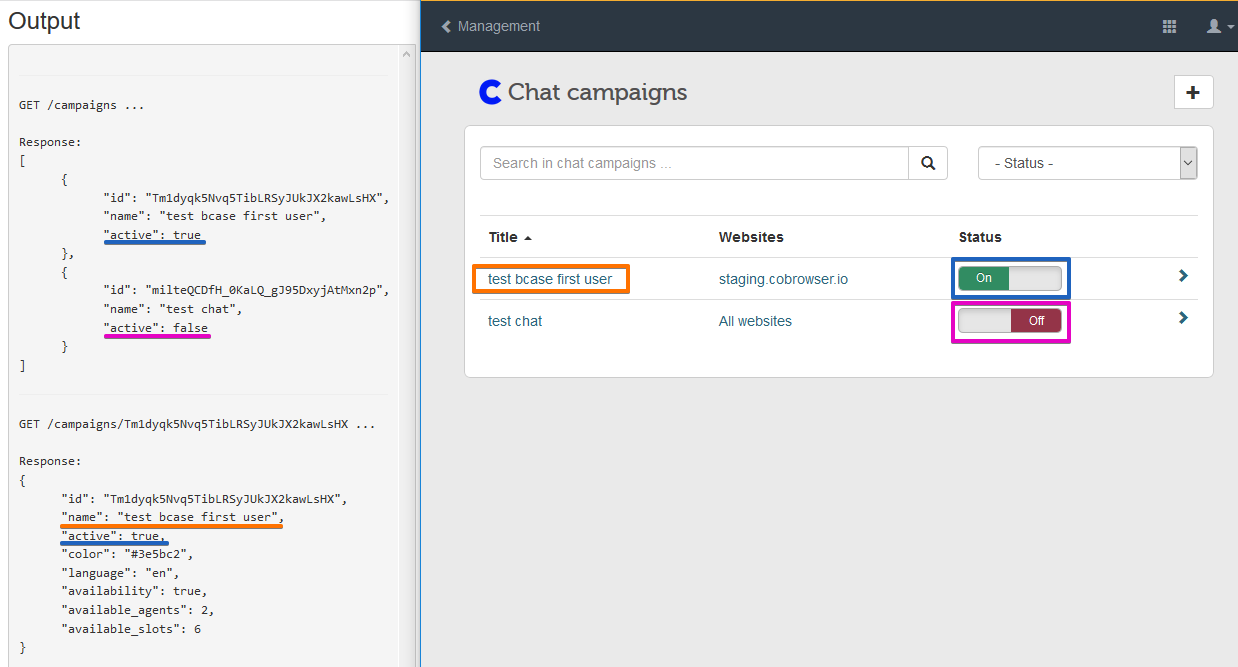
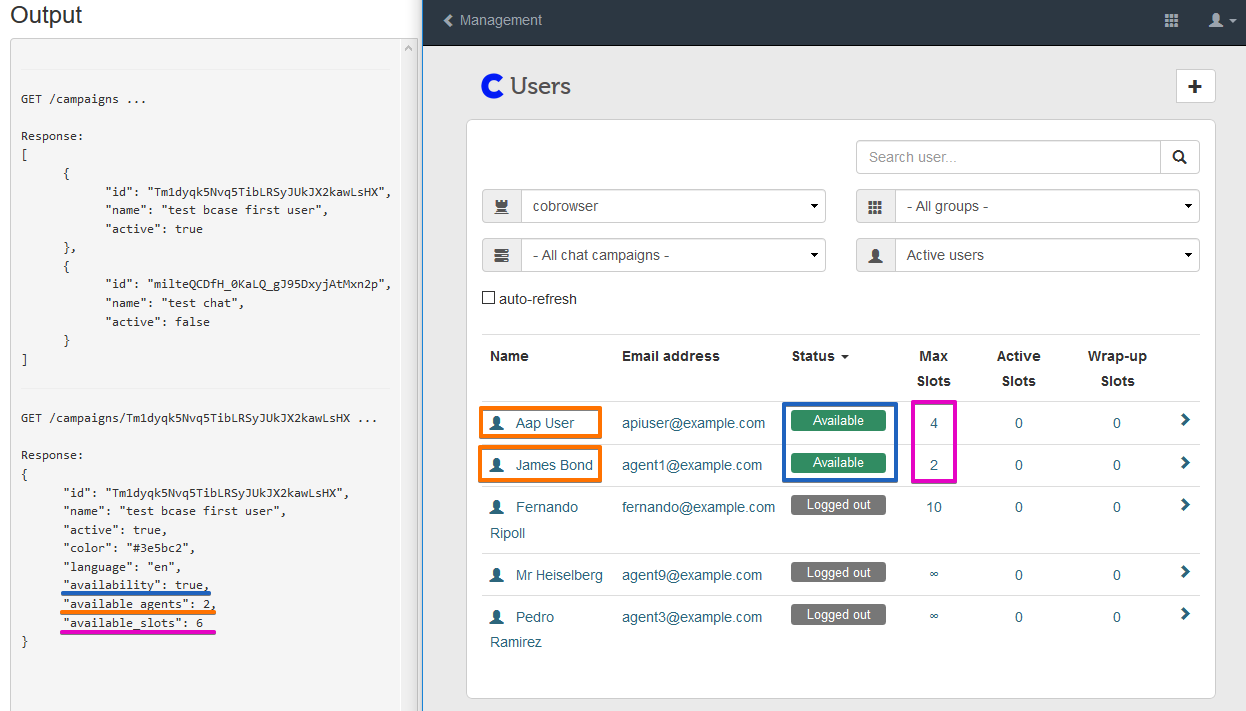
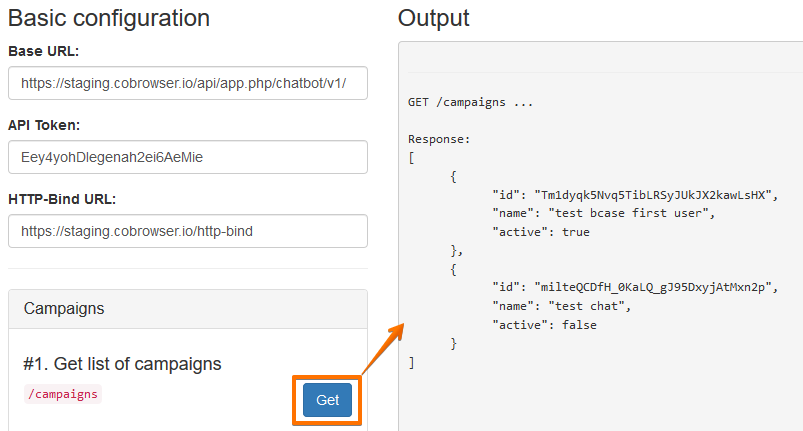
After User clicks first "Get" button of the "Campaigns" block, "Output" log window will display next generated information: ID, Name and status of all existing business cases in the system, where:
ID - unique set of digits, assigned to a particular chat campaign.
Name - the exact title, recorded in the system for every chat campaign.
Active true - indicator of active chat campaign status (enabled by Manager).
Active false - indicator of inactive chat campaign status (disabled by Manager).
In case if chat campaign is removed from the system, information about it will not be generated here anymore in the future. ID, Name and status for every chat campaign are shown separately.
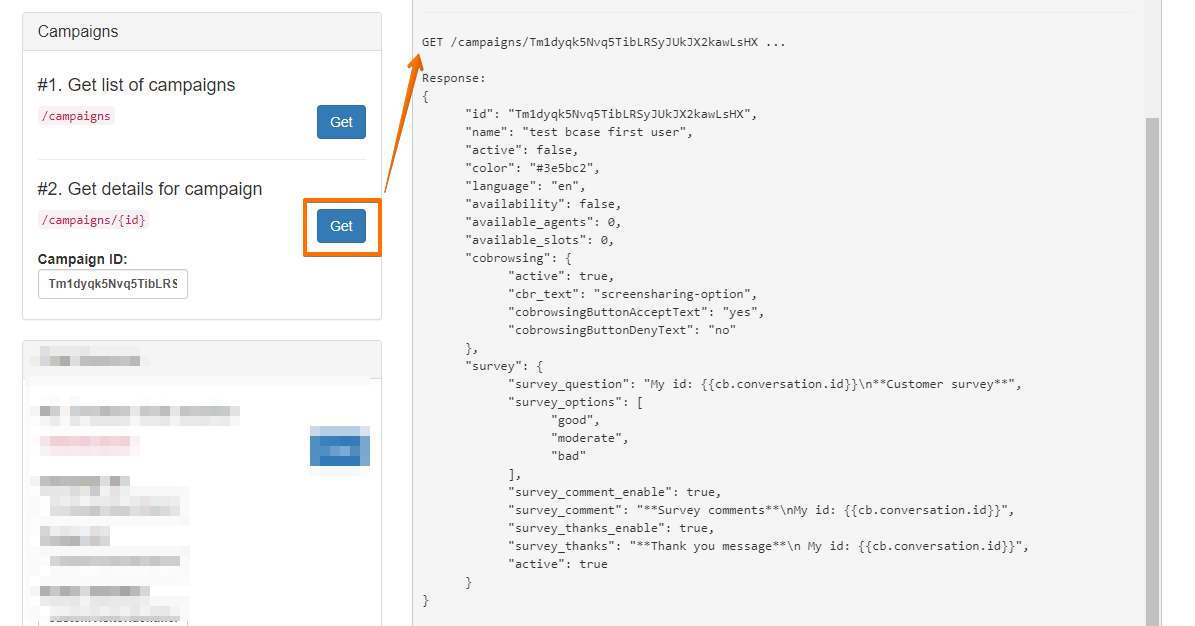
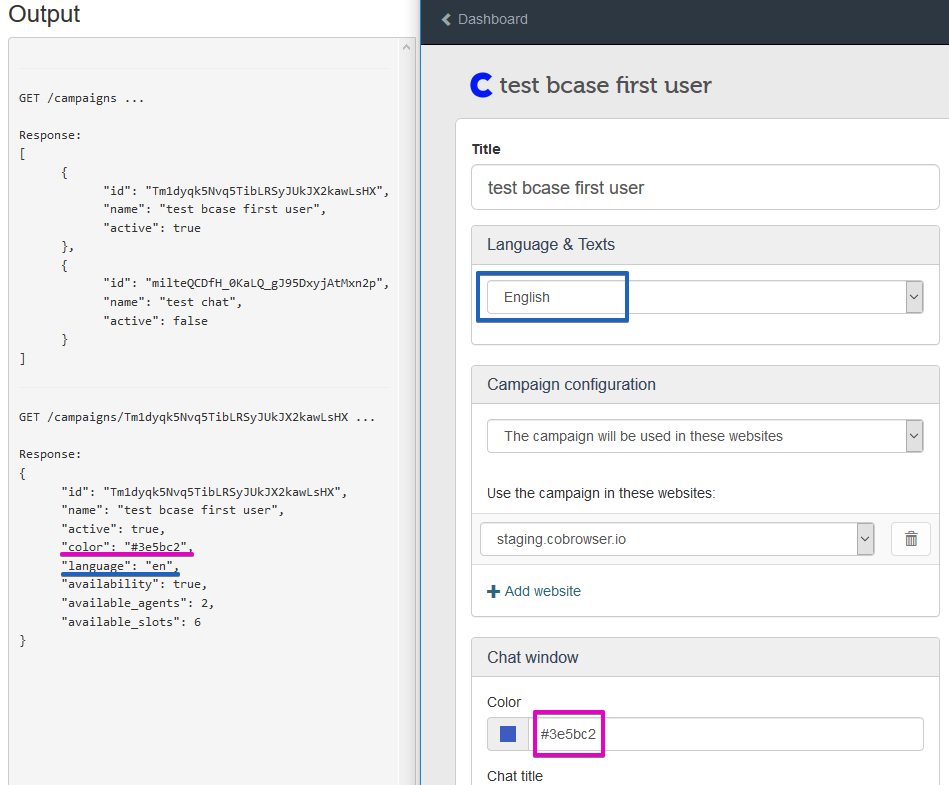
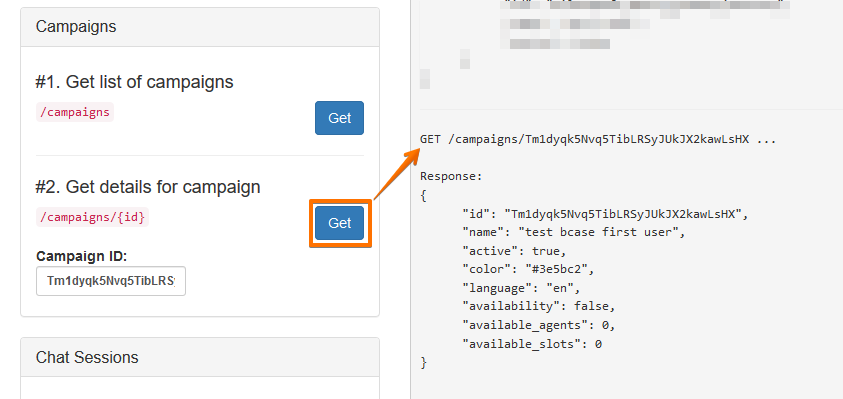
User also is able to get some details about selected chat campaign such as: ID, Name, Status, Color, Language, Availability, Quantity of available agents in the system, Quantity of available slots in the system, where:
ID - unique set of digits, assigned to a particular chat campaign
Name - the exact title, recorded in the system for every chat campaign
Active - status of the chat campaign
Color - color set up in the system for the title of the chat campaign
Language - language set up in the system for business case of the chat campaign
Availability true - indicator of agents presence in the chat campaign
Available agents - Quantity of available agents in the system
Available slots - Quantity of available slots for the incoming chats in the system
Cobrowsing - all additional info about screensharing option in the chat campaign
Survey - all info about Customer servey settings in the chat campaign
Active true - indicator of active chat campaign status (enabled by Manager).
Active false - indicator of inactive chat campaign status (disabled by Manager).
Name - the exact title, recorded in the system for every chat campaign.
Color - color set up in the system for the title of the chat campaign
Language - language set up in the system for business case of the chat campaign
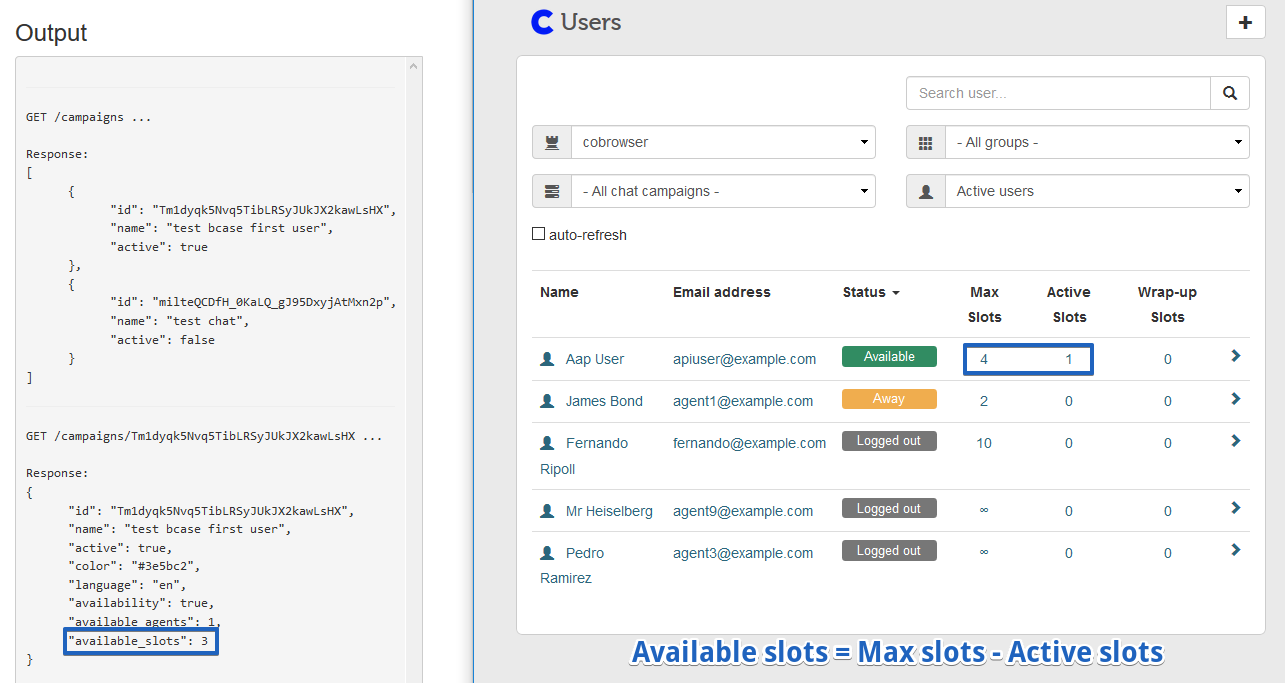
Availability true - indicator of chat campaign Agents are logged into the system and available to receive a chats.
Available agents - Quantity of available agents in the system.
Available slots - Quantity of available slots for the incoming chats in the system.
Available slots - Quantity of available slots for the incoming chats in the system = Max slots - Active slots
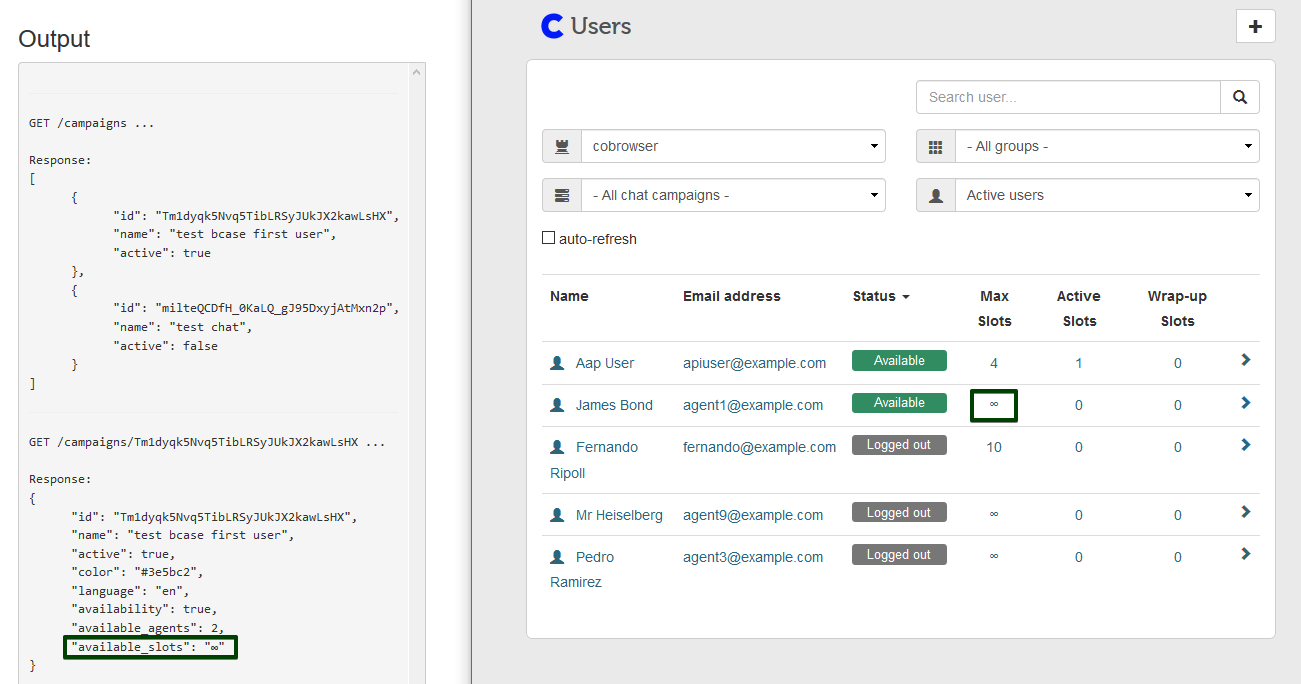
"available_slots": "∞" information means that there is no limitation for the incoming chats in the system. Available slots value will have infinity record, if at least one available agent does not have limit for chats set up in User`s profile in the Agent settings block.
Availability can be "false" if there are no logged in Agents or Agents with "Available" statuses, or all Agents have reached max slots in the system. In this case "Available agents" and "Available slots" values should be zero = 0.
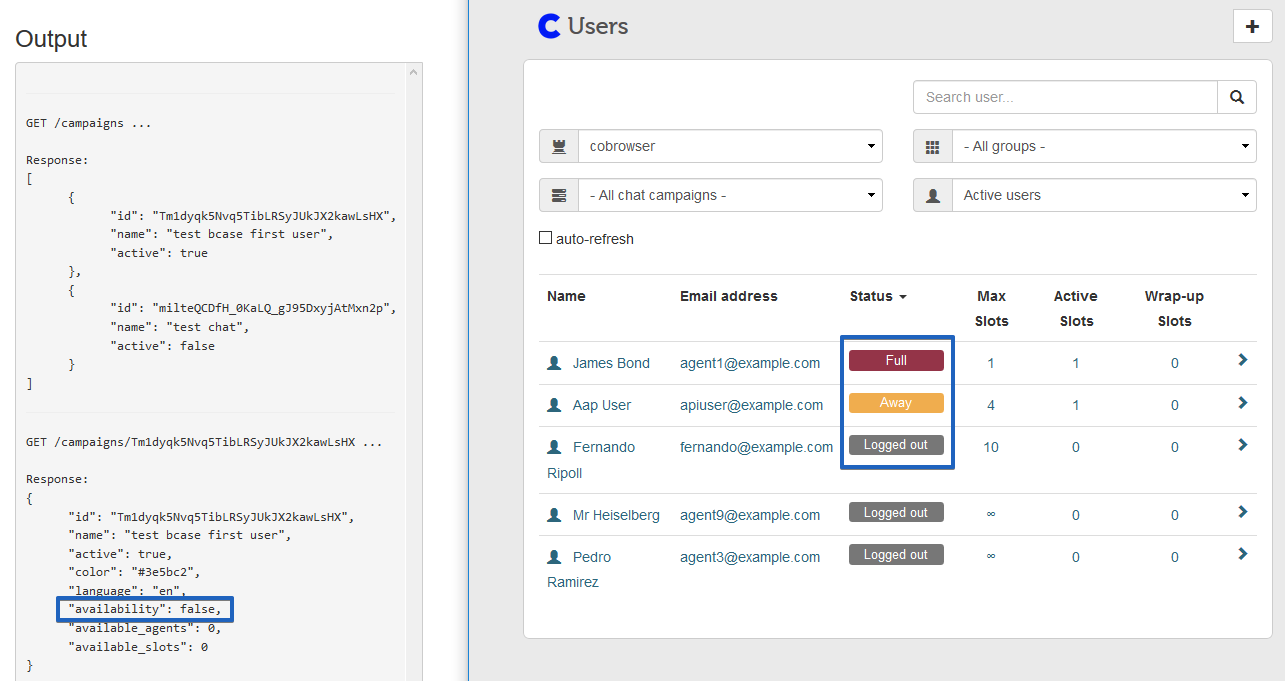
So in this case, when "Availability" is "false", Chatsession generation will not be possible.
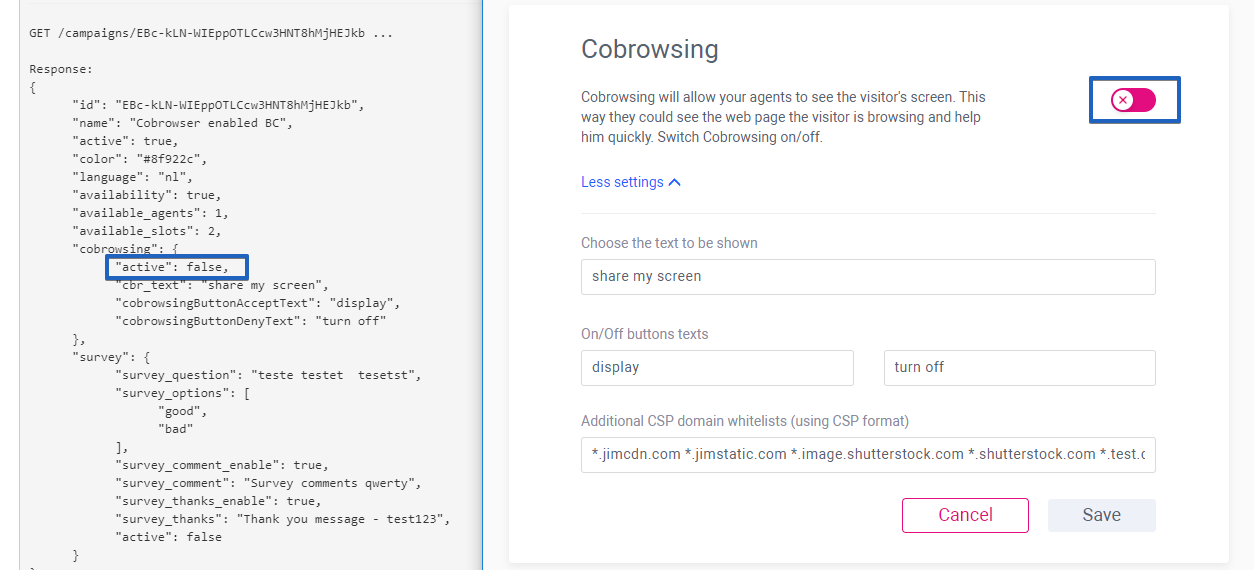
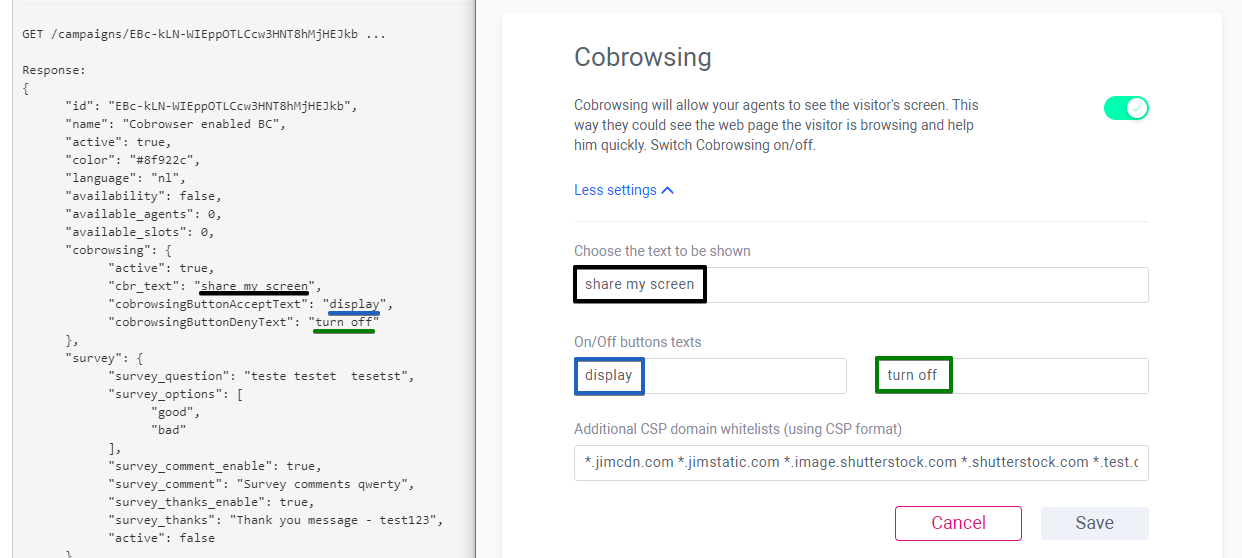
Cobrowsing displays general information about screen sharing option in the chat campaign: status, text displayed on the screen, on/off buttons text.
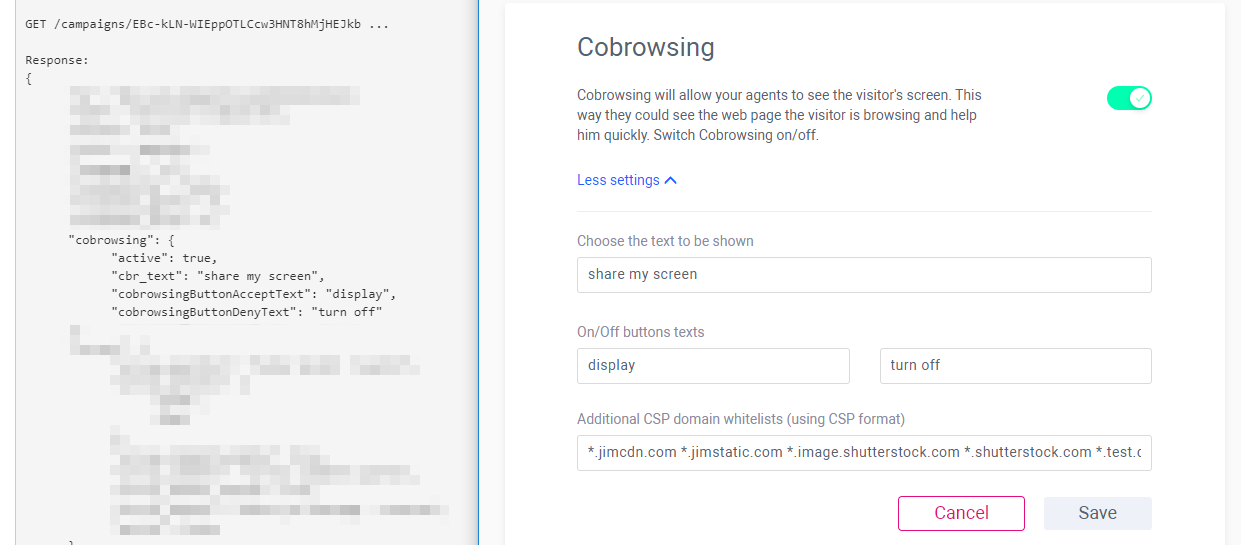
Active true - is an indicator of active plugin in the campaign (enabled by Manager).
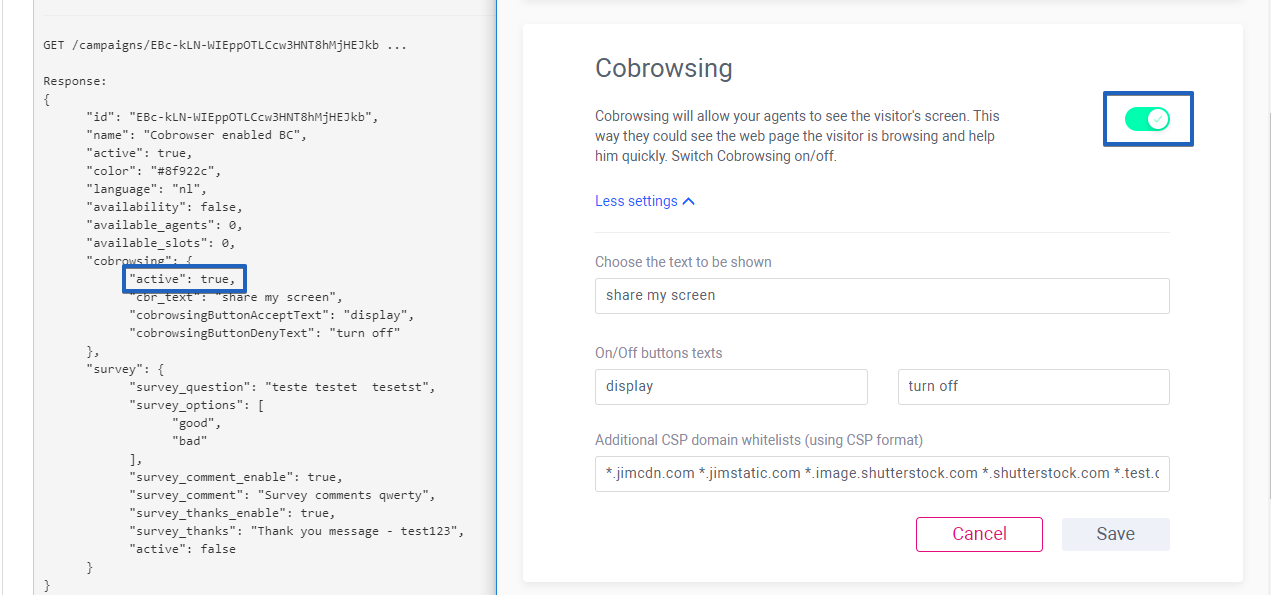
Active false - indicator of inactive plugin in the campaign (disabled by Manager).
cbr_text - displays the custom text saved in the "Choose the text to be shown" textfiled;
cobrowsingButtonAcceptText - displays the custom text saved in the "On button" textfiled;
cobrowsingButtonDenyText - displays the custom text saved in the "Off button" textfiled;
If Cobrowsing option stays disabled for created chat campaign and was not saved at least once, then:
Active status is "false", because it was never enabled by Manager yet.
And cbr_text, cobrowsingButtonAcceptText, cobrowsingButtonDenyText values will display "null" as there are no text input yet. It is expected behaviour.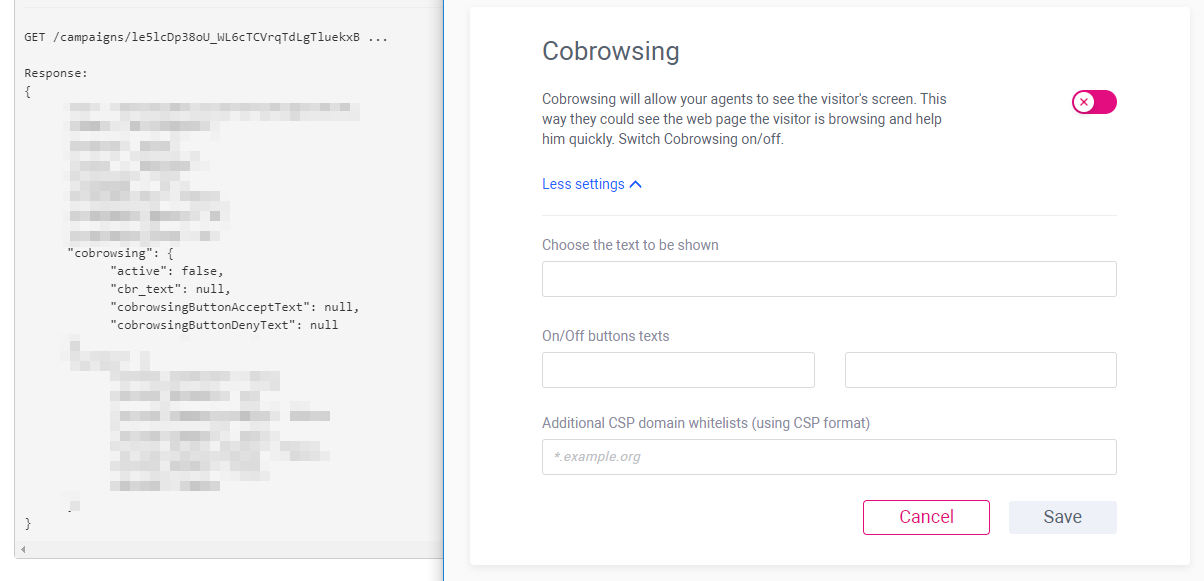
Cusomer servey option info is also displayed in the response in a full way:

Active true - indicator of active plugin in the campaign (enabled by Manager). Active false - indicator of inactive plugin in the campaign (disabled by Manager).
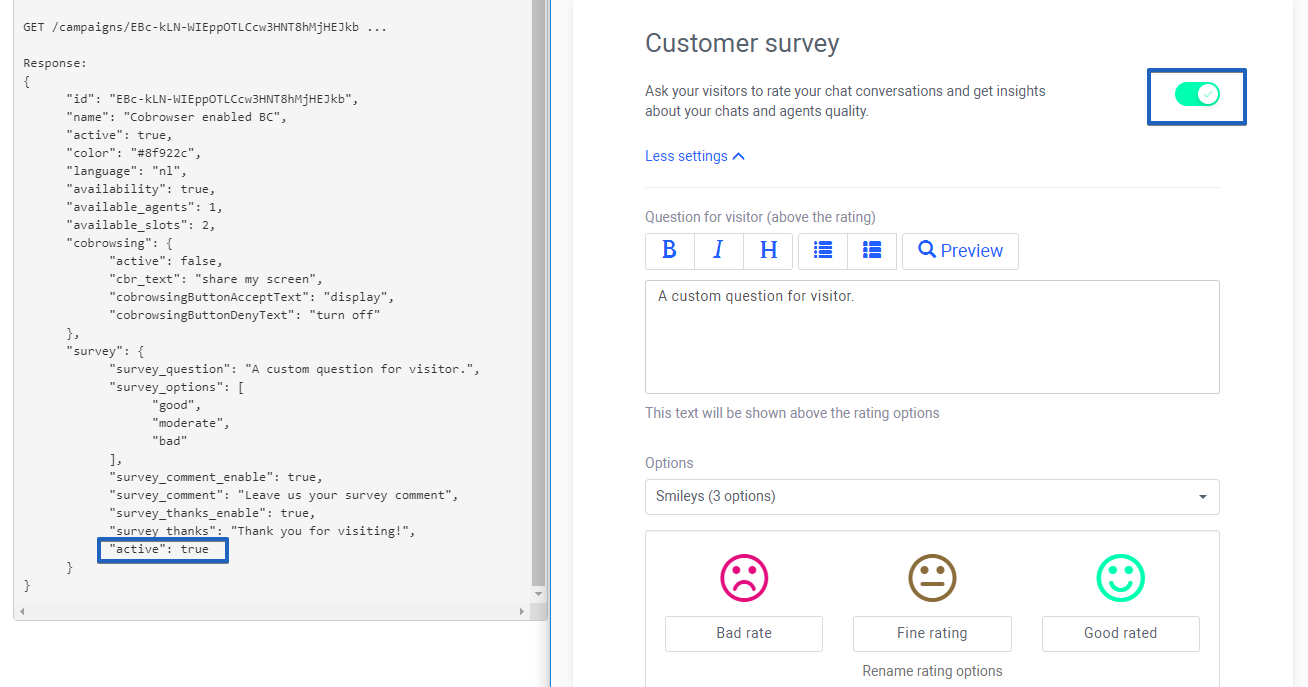
survey_question - displays the custom text saved in the "Choose the text to be shown" textfiled;
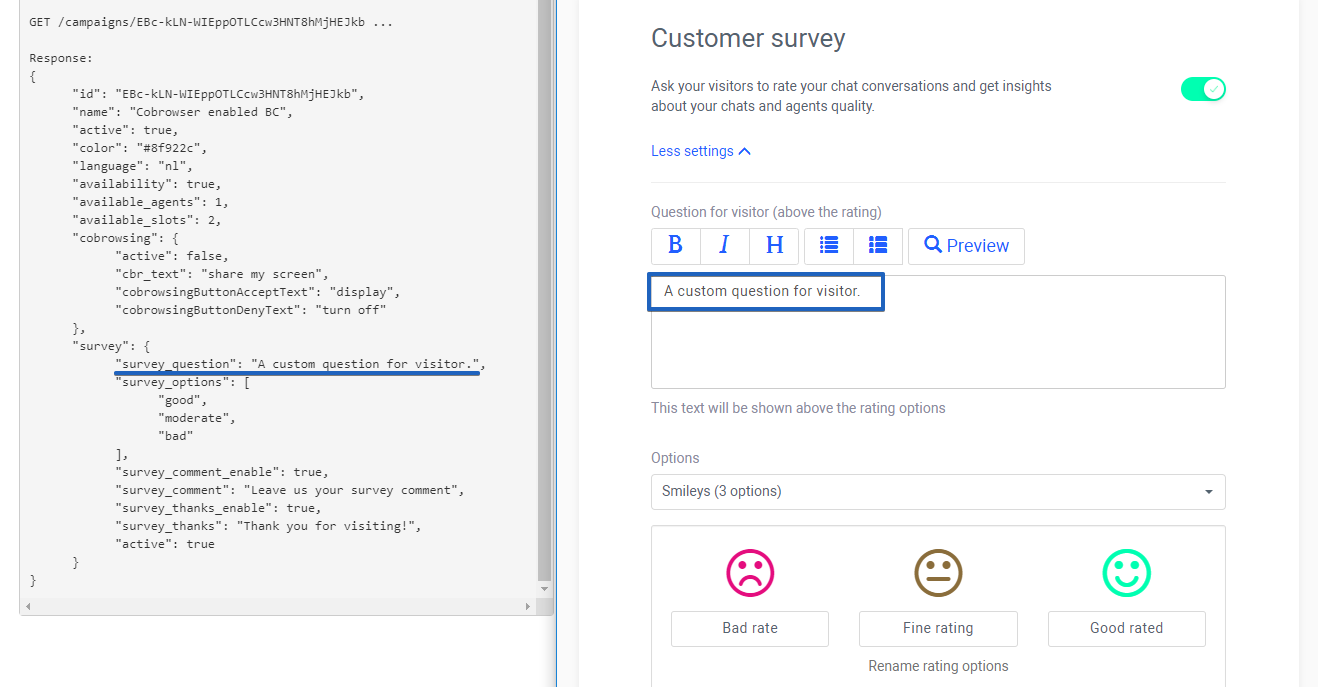
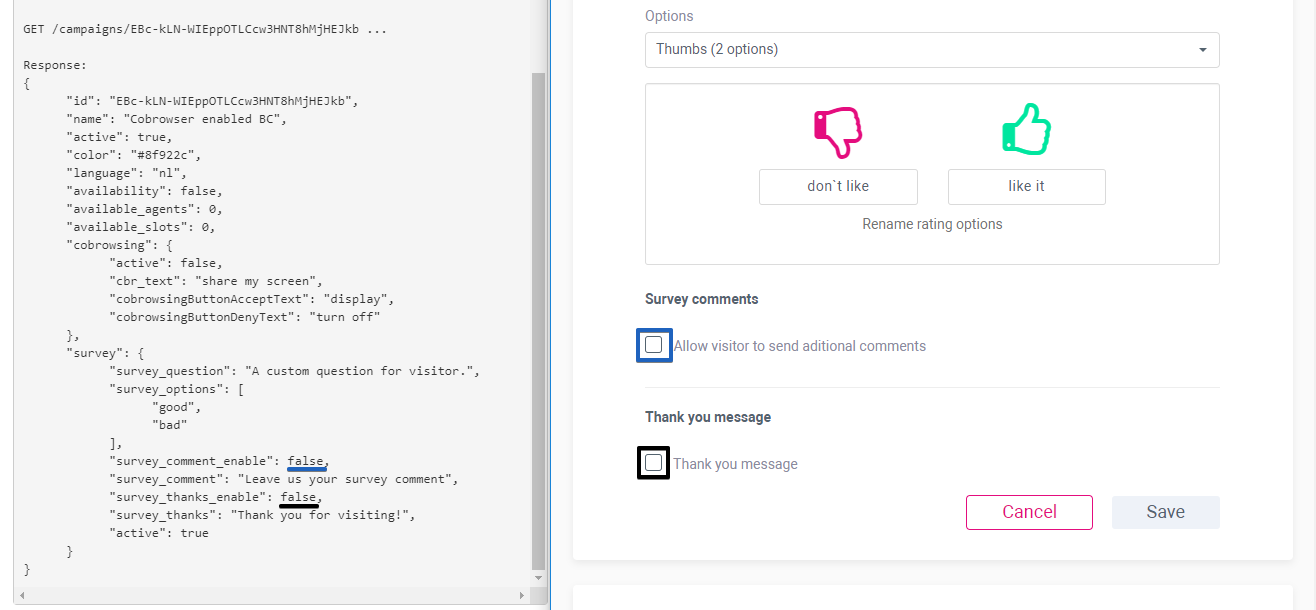
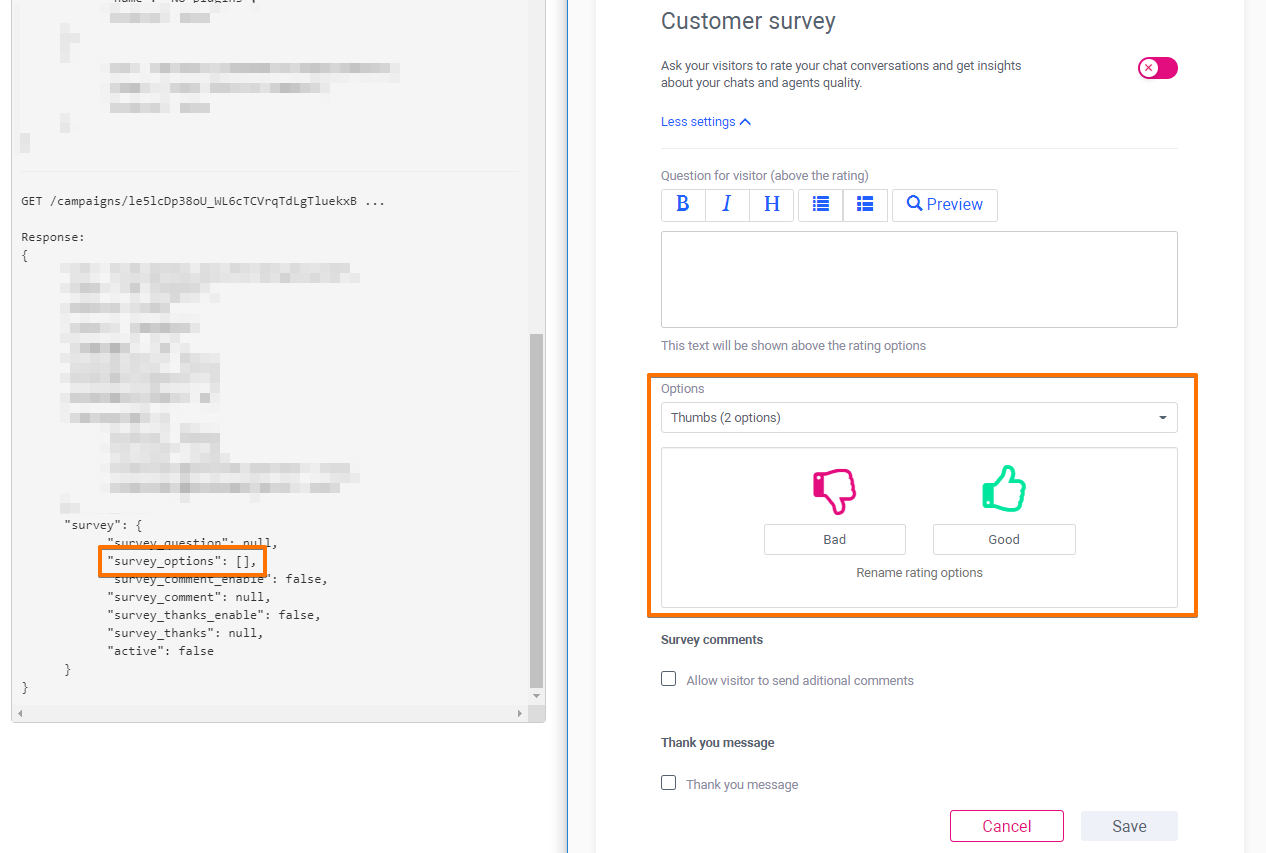
survey_options - displays "good", "moderate", "bad" options selected in the Options dropdown and applied to the chat campaign by Manager. These values do not depend on language or translation, do not take into consideration custom text. These are only good, bad and moderate values if "Smileys" option selected in the dropdown.
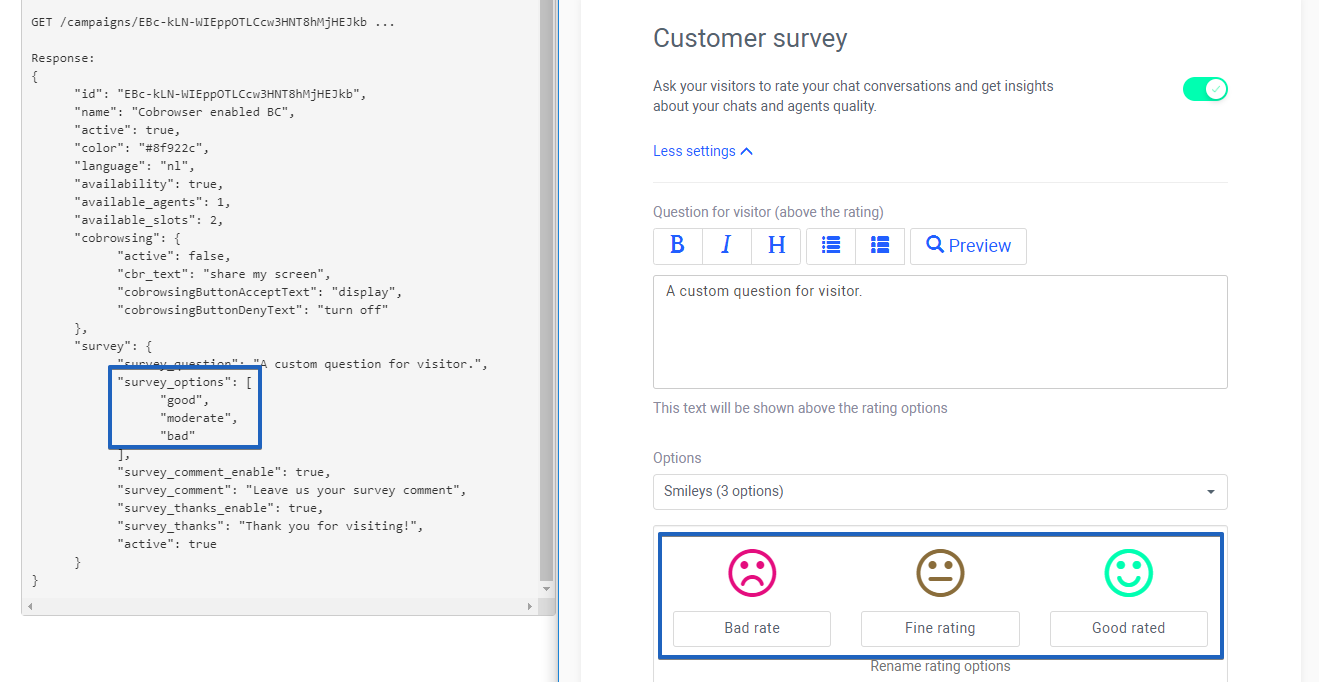
Good and bad values are displayed for survey_options when "Thumbs" option selected in the dropdown.
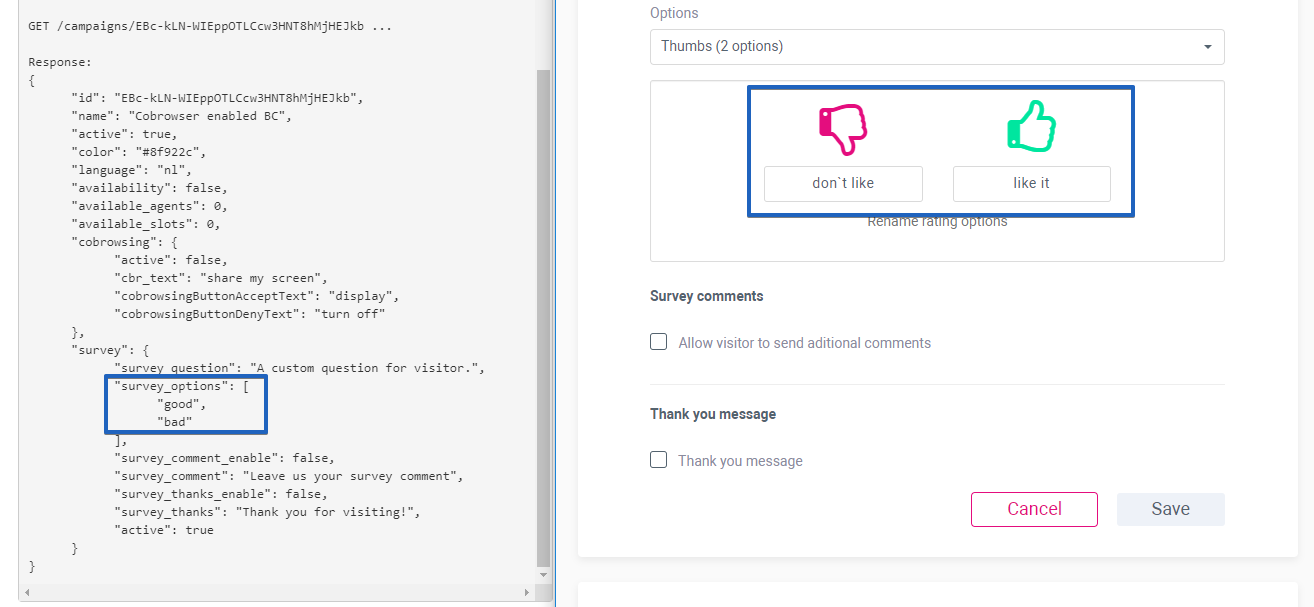
True or false values are displayed for survey_comment_enable and survey_thanks_enable if additional options enabled or disabled in the survey plugin.
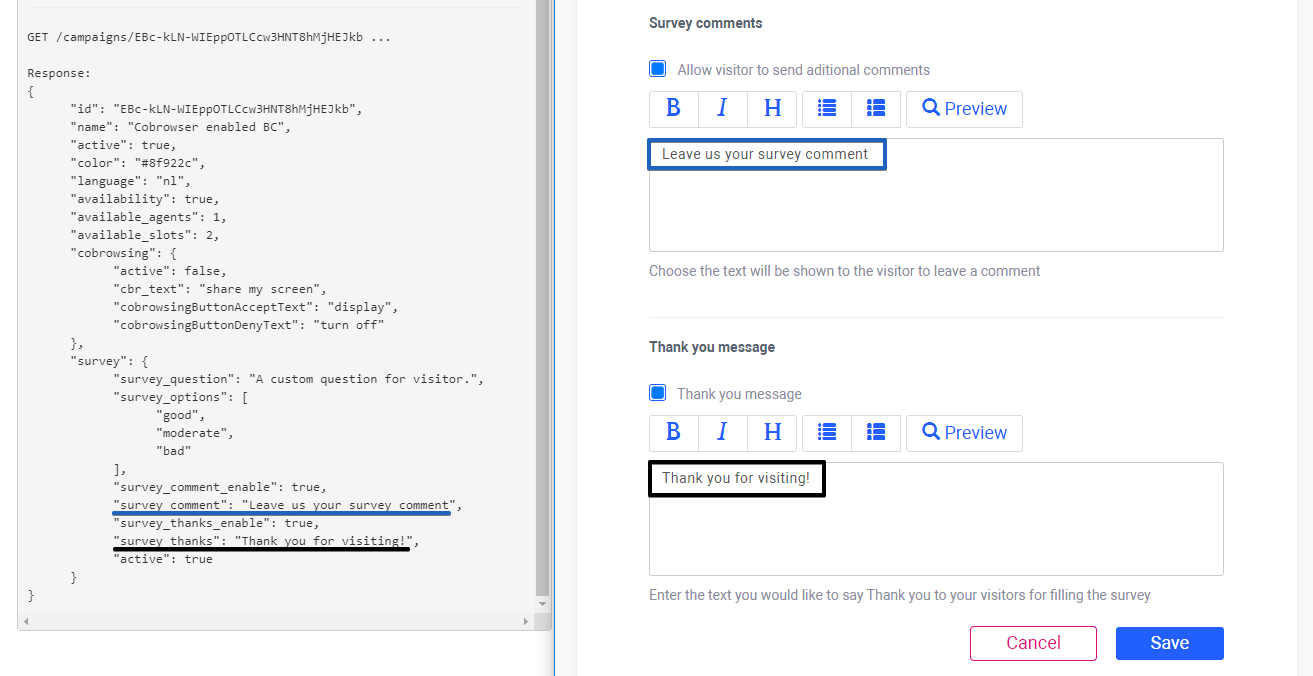
survey_comment_enable - reflects "Survey comments" option setup by Manager;
survey_thanks_enable - reflects "Thank you message" option setup by Manager;
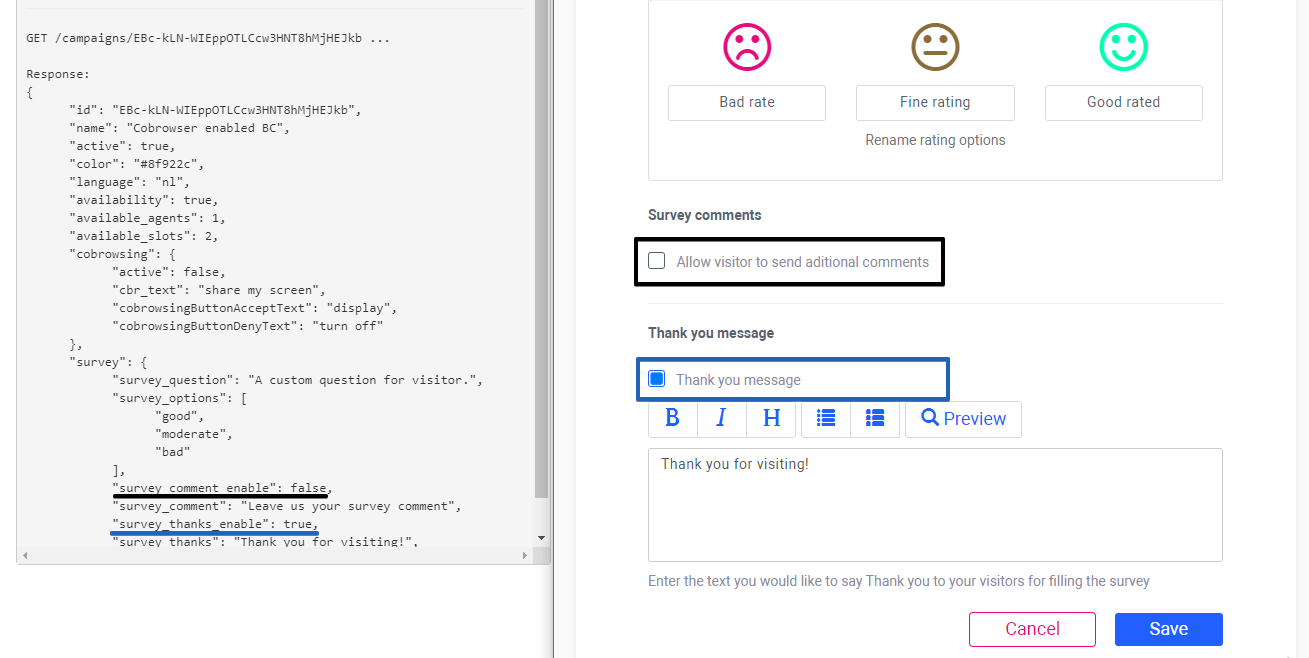
Value is "false" when it`s disabled and "true" if enabled on the Manager side.
survey_comment - displays the custom text saved in the "Survey comments" textfiled
survey_thanks - displays the custom text saved in the "Thank you message" textfiled
If Customer survey option stays disabled for created chat campaign and was not saved at least once, then:
Active status is always "false", because it was never enabled by Manager yet;
survey_comment_enable and survey_thanks_enable are "false", because they were never enabled by Manager yet;
servey_question, survey_comment, survey_thanks values will display "null" as there are no text input yet;
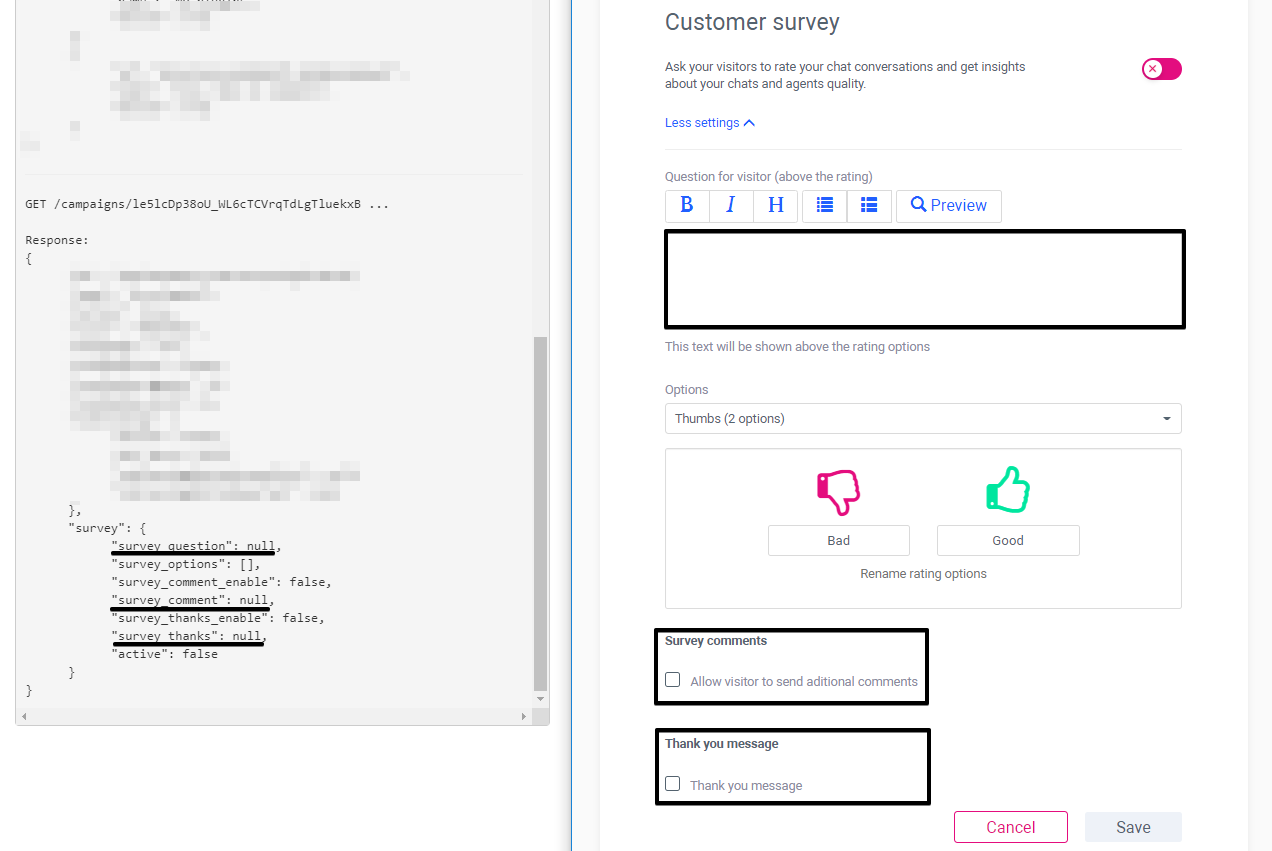
survey_options displays "[ ]" while there is "Thumbs" option pre-selected in chat campaign. It is expected behaviour.
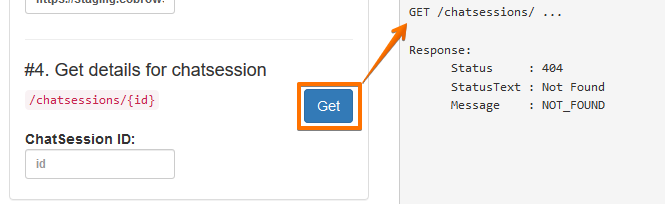
When "Availability" is "false", Chatsession generation will not be possible. That`s why posted Chat session information will consist 409 error status, Conflict status text and "No Availability" message. And reguested details for the chatsession will response with 404 error status, Not found Status Text and "Not found" message.
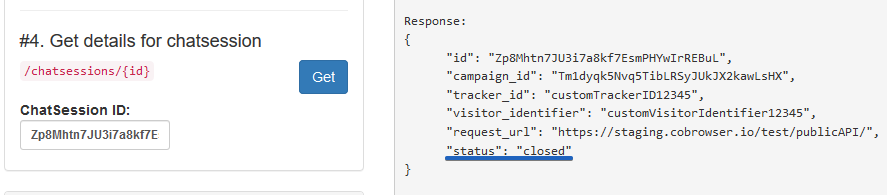
In case User tries to get detailed information about already finished and closed chat, then "Closed" status will be shown in response in case the chat has been already closed by Visitor, Agent or both sides.
ChatSession Statuses can be: created, active and closed only.
Let`s consider the situation. when it is impossible to start a chat:
#1 User get a list of existed chat campaigns --> User gets the information about active chat campaign
#2 User gets details for the requested campaign by Campaign ID --> User gets response that there are no available Agents in the system
#3 User creates a new chat session by posting Campaign ID, Tracker ID, Visitor Identifier, Request URL --> User gets response, which means there is no possibility to create a Chatsession
#4 Sinse there is no possibility to create a Chatsession, because ChatSession ID was not generated, User will get error response.
#5 User will try to create XMPP connection by posting a request, but this is impossible wit absent ChatSession ID 
#6 "Get details for XMPP connection" will give error response as well, as there is no generated XMPP Connection ID
As a result: #7 "Connect XMPP" button should be disabled and User will not be able to connect to Agent and start a chat.
User is able to start a chat only with active chat campaign (business case) on the Manager side. Output log window will give next warning Response in case User tries to start a chat using Campaign ID in inactive (false) status:
Status : 409
StatusText : Conflict
Message : CHAT_CAMPAIGN_INACTIVE
Chatcampaign_id generated for CSV reports and for the public API is different. The id user seeing in the public API is encoded due to security reasons. ID is encoded with the API Token visitor is using, so this way if an API Token is revoked and some hacker had the Encrypted ID, that encrypted Id will not be longer valid.
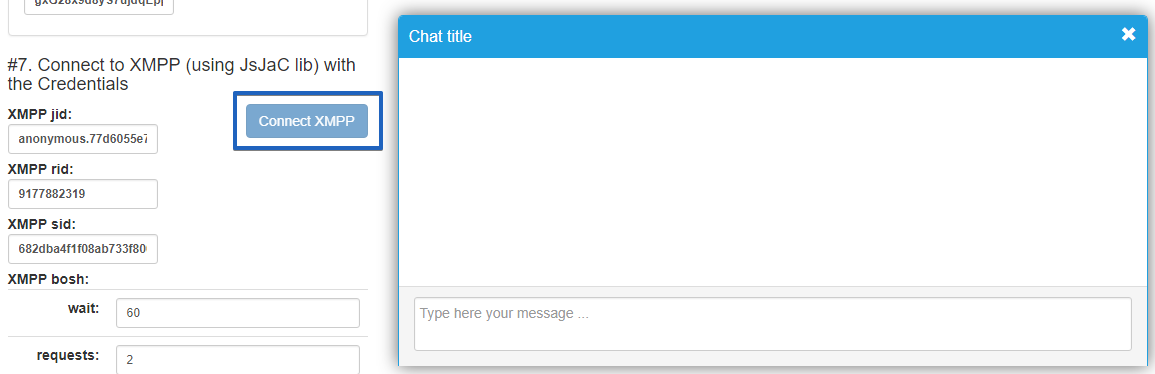
In our current software all those 3 steps (create chat session, create xmpp connection and connect with XMPP server) happen at the same time. However when we split it up in 3 different steps:
- when you create the chat session, the system has already checked availability and has already selected an agent and he/she was assigned to the newly created chat session (that’s the reason you already saw it in active slots in “show colleagues”)
- when you create the xmpp connection is just a step to be validated on XMPP server. So if the agent changes his availability your chatsession was already assigned so that’s not a problem.
- when you connect with XMPP server. ChatSession and XMPPConnection were already created so this is the final step, to notify agent that he has a new chat and that’s the moment the chat appears in agent side.
Connect XMPP button becomes unavailable after a chat has been successfully created
"Agent is available again !" feedback message is shown for the Visitor every time Agent switches the availability button, because every time Agent changes availability, we receive a presence updating in the system.
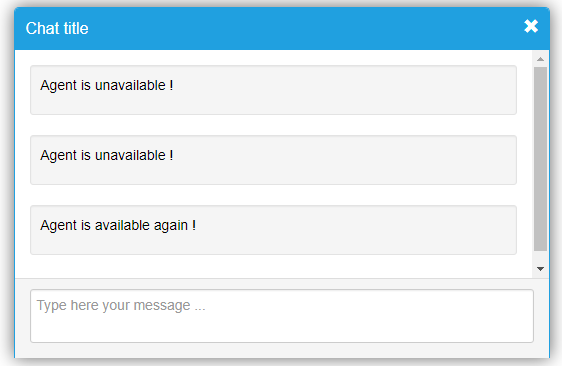
Every page refresh on the Agent side records the available/unavailable status for the Visitor in the dialogue chat, as we have it now in our current software. When Agent refreshes the page, Visitor could see a small message (agent offline/online) for a sec or so.
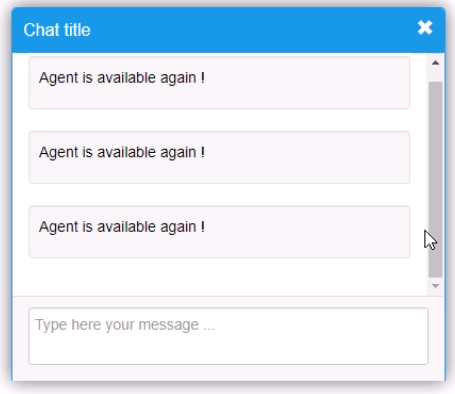
Also these messages will be shown, when Agent closes or has some connection issues and when Agent recovers.

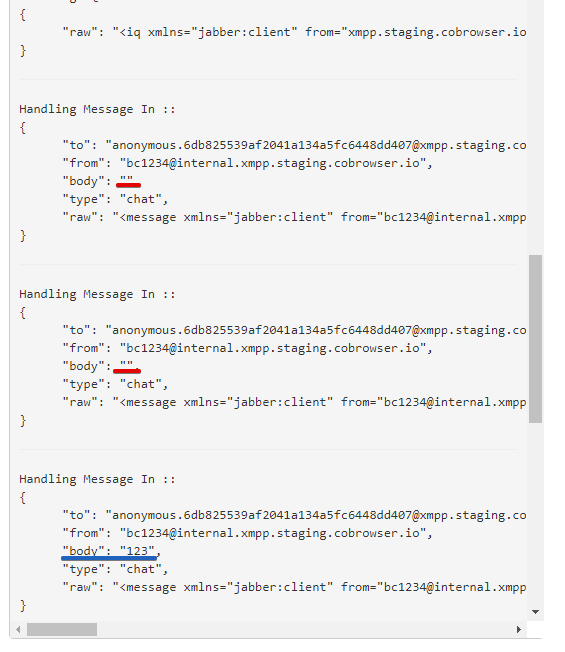
Output field generates some extra "Handling Message In" and "Handling Message Out" info with duplicate lines and empty "body" info just before to post the actual one. It happens because is sending state “composing” and states are handled as <messages>.
accept_url will be equal to request_url if you provide it obviously
Also User is able to update chatsession using a new patch #4.1.
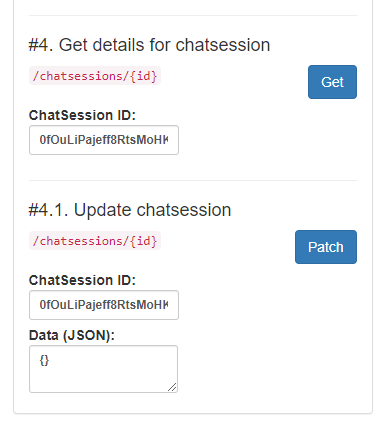
It allows to update conversation and apply customer survey during active chat session.
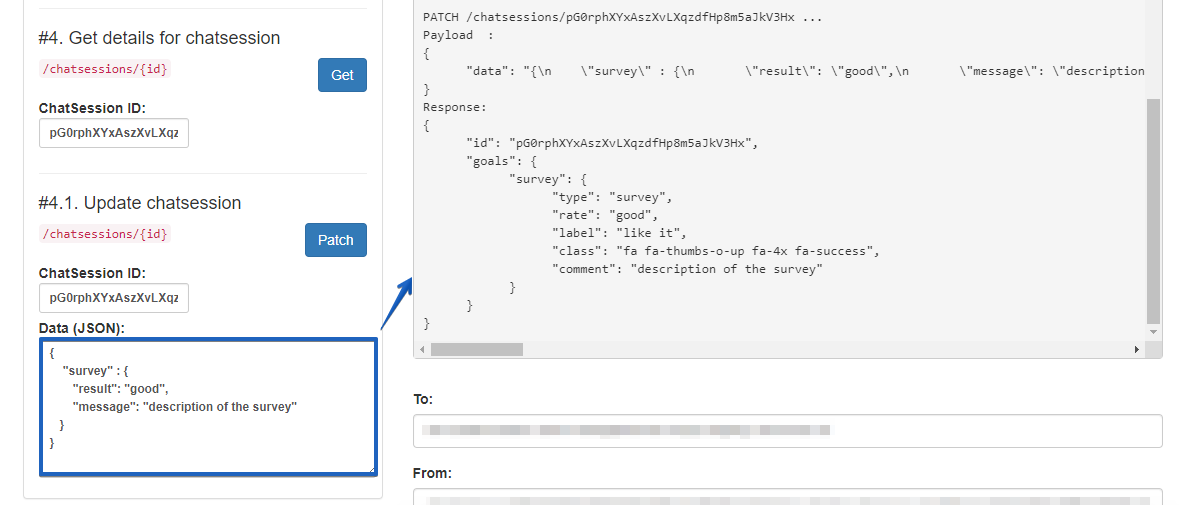
Also user can do it after, when chat is closed by Agent. Or even to update already sent survey with changed rate type and comment.
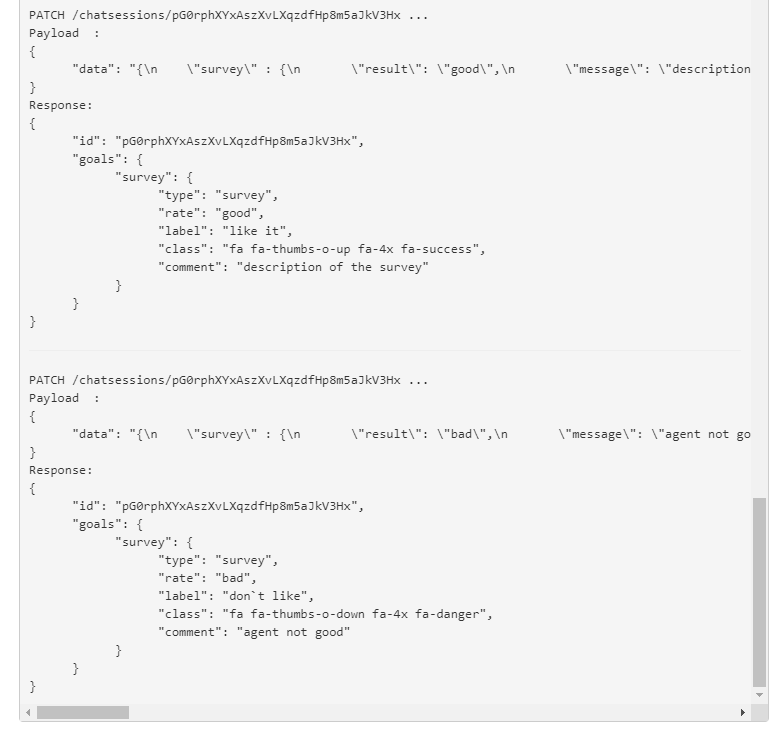
Be sure that survey option enabled and setup with needed rates and leaving a comment is possible.
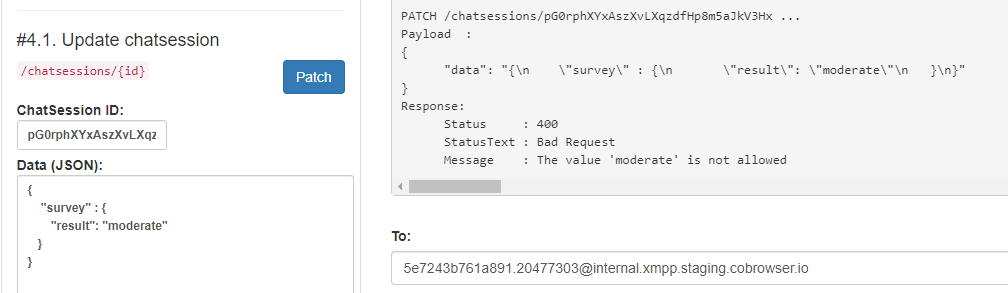
If it`s not, the system returns the warning message. Remember that it`s impossible to leave a comment if this is not allowed by campaign settings, or to send a "moderate" rate if the "Thumbs" with only two "bad" and "good" options selected in the chat campaigns.
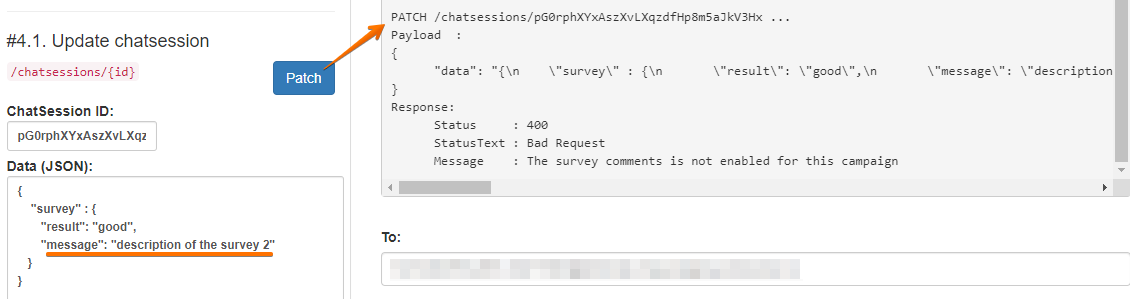
On the Manager side it looks like this, where "label" is a custom text input by Manager for every servey rate option.
Example for patch #4.1:
{ "survey" : { "result": "good", "message": "description of the survey" } }
Main differences between real live chat and Public API chat
On the Agent side:
- Url link, which informs the location of the visitor, will not be shown on the top, in case of a Public API public chat.
No time recorded, in the output panel only the info coming in/out is displayed. Opening text, closing text, pre-chat, cobrowsing and survey are not suppported current in the Public API.
On the Public API demo test site
The Public API demo test site, is just an example of a simple Javascript client built with JsJac lib. It's not identical, in terms of behaviour, as our current chat widget. Is up to you to built same functionality with the provided tools.
However is good to mention that opening text, closing text, pre-chat, cobrowsing and survey are not supported in the current Public API version.
You can setup the title of the chat client using Campaigns information, as you can see below, the cobrowsing on/off button is not displayed in the test demo site.
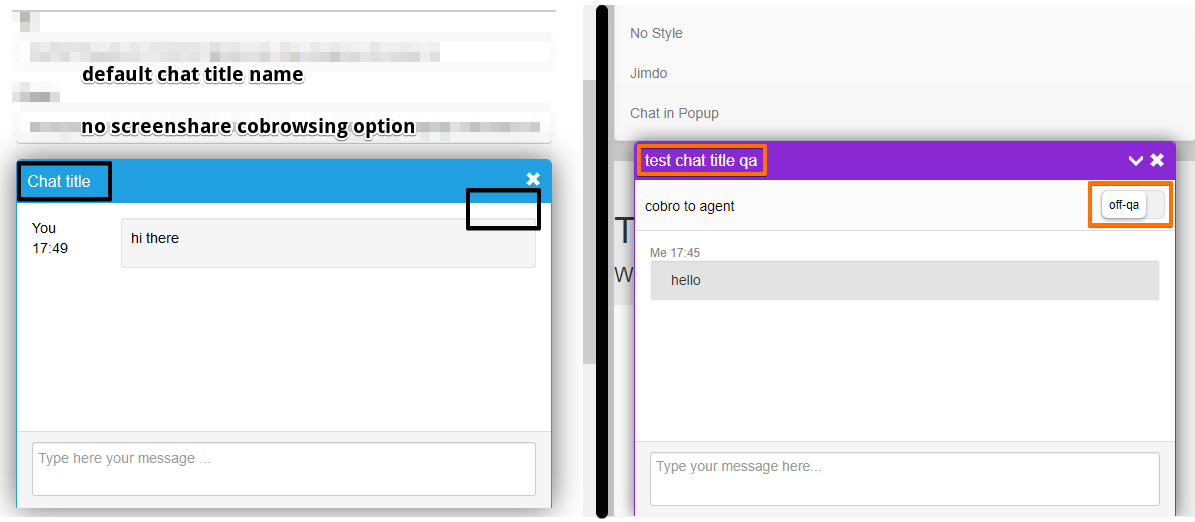
Chat title will have default color and all internal system messages will be shown by default in English. User will be able to get all real information about actual color and language, set up in chat campaign on the Manager side, in the Output and use them to configure the apperance of your chat in your software.
Agent`s avatar will not be shown in the dialogue as well.
Reconnection to another Agent is not able in this version. So in case Agent went offline or lost the connection, only message about it will be shown.
Public API and Reporting
chatcampaign_id recorded into Conversation report won't match the Campain ID generated in the widget, due to security conditions.
The Campaign ID you see in the Public API response endpoints is a custom hash encrypted using your Public API Token, real Chat campagin ID won't be shown there.
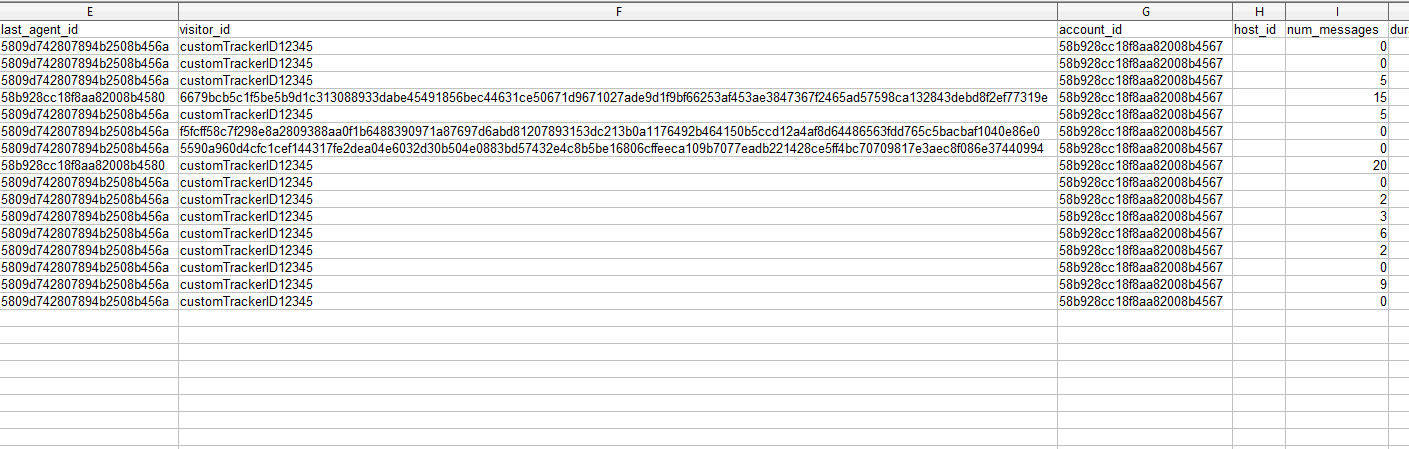
visitor_id in the Conversation report = Tracker ID in the Public API.
If you don't provide it, then one random ID will be generated into reports.
Visitor Identifier value from the Public API = visitor_identifier in reports.
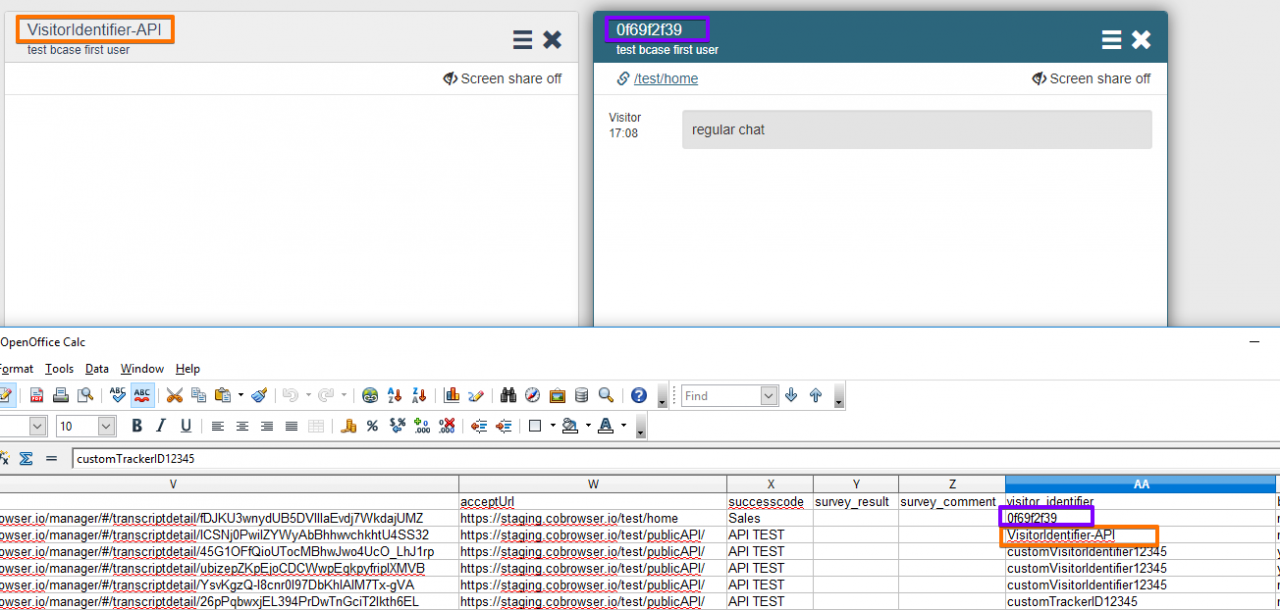
In case you don't provide visitor_identifier, system will get random value shown on the Agent side and record it into reports.

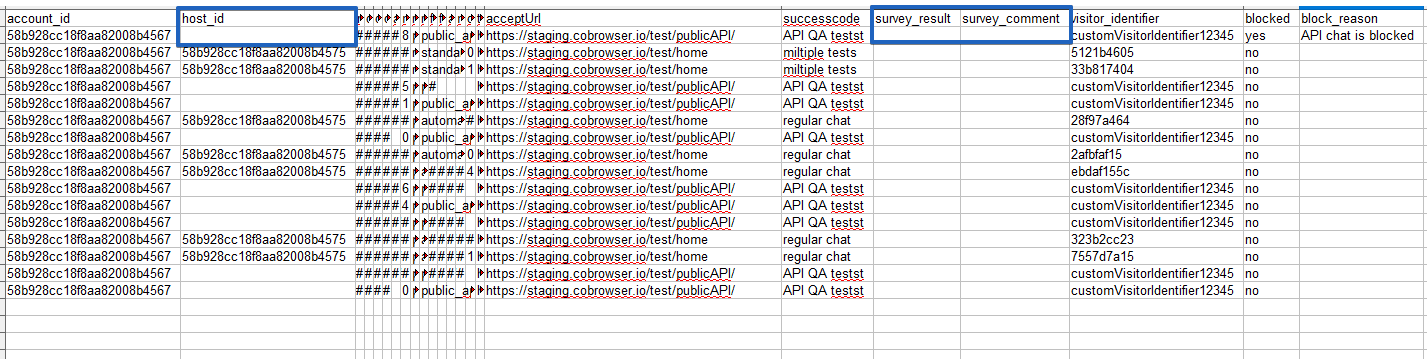
host_id will be empty for all the Public API chats, because we don't have that information in Public API.
survey_result and survey_comment cells will be empty in the Conversation report, because Customer survey is not supported in the current Public API version.
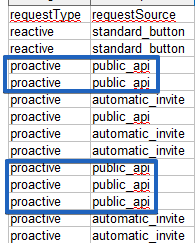
Public API requestType is generated as 'proactive' and requestSource will be recorded as 'public_api' into Conversations reports. This way managers can identify all the chats generated using the Public API easily.
accept_url will be equal to Request URL if you provide it during ChatSession creation.
decisionTime cells in the Conversations reports will be empty as well, because decision time is "the time between the the visitor sees the chat button/auto invite and clicks it to start a chat" and for Public API there are no buttons at all.
Hostspecshourly CSV reports will not affected with API public chats at all.
Customization
You as a 3rd party company using our Public API will be able to see every 10 secs Ping from server and you MUST reply with IQPing in a console tab. This way visitor and server know that the connection is alive.
If you compare some functionalities such as links between the Public API demo test site and CoBrowser real chat widget, you could notice that links are not displayed as clickable.
In this document we have described all the methods and tools you can use to use CoBrowser software to start a chat. Now it's your time to use those tools and built your own chat widget providing the functionality as you want.
XMPP Credentials
User is able to start a chat as a Visitor using XMPP Credentials as well. Using either XMPP Credentials or XMPP Connections options can be applied for the new chat creation at the same time. XMPP Credentials allow to connect directly to the Agent without using connection trough a browser.
Example how to setup and connect using xmpp credentials (Pidgin application is used as a samlpe)
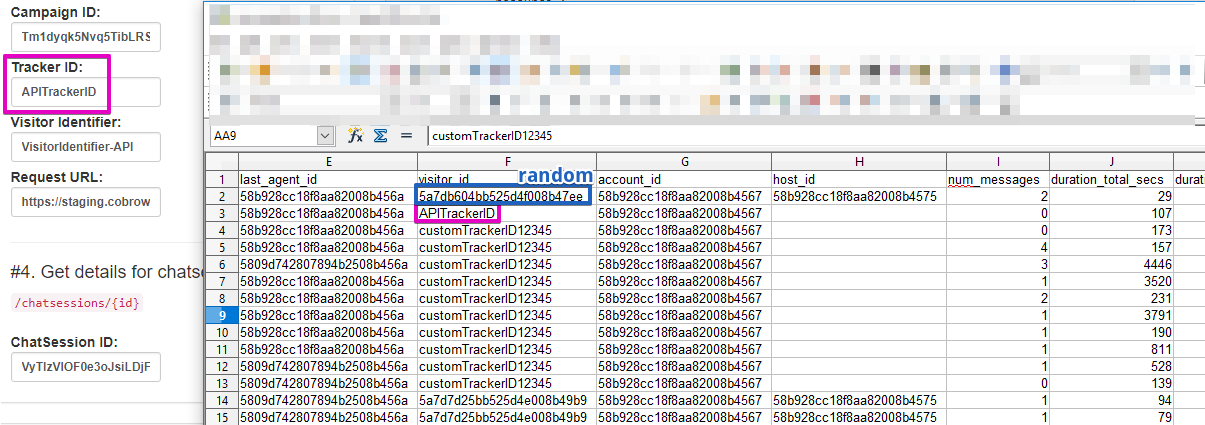
In case when User does not provide system with Tracker ID or Visitor Identifier, random values will be generated in a Public API and recorded into the system. Full randomly created data for the Tracker ID will be shown as "visitor_id" and only first 9 symbols, generated for the Visitor Identifier, will be recorded into the system "visitor_identifier" cells of the Conversations CSV reports.
Agent info may not be changed after chat forwarding. Same data may be displaying no matter that new Agent sends messages. When the conversation has been forwarded, system is sending a special message to the visitor (Pidgin software), so if the software does not understand these special internal messages, then nothing will be changed. That’s ok. The 3rd party company should be able to receive and properly handle those internal messages.
Chat on the Agent side can be still active, after it has been closed via Pidgin application and vice versa. Information about Visitor is typing may be absent on the Agent side. User may not see info that "visitor has left the website" after needed time expires on the Agent side and not to get info, that Agent has left (f.e. Agent logged out without closing chat) on the Visitor side. All these happen because of the same reason: when the chat has been closed in the platform, system sends a special messages, however Pidgin software is not doing so. The 3rd party company should send the close state in order to get the “visitor has closed the chat” and etc. messages on the Agent side. System sends that data, but the client needs to show that info, because in this external tools they’re not handling those details.
Comments
0 comments
Please sign in to leave a comment.